Positive Material Identification (PMI)
ME & MA
Positive Material Identification (PMI)
1.0 INTRODUCTION
Positive Material Identification (PMI) is one of the more specialized nondestructive testing methods. With positive material identification the alloy composition of materials can be determined. If a material certificate is missing or it is not clear what the composition of a material is, then PMI offers the solution. Because specifications for materials used in industry are increasingly more specific, the need for PMI testing has been on an increase for the past several years.
Periodic plant maintenance shutdowns are less frequent and consequently the materials used in the plant are in use longer. A wider variety of alloys that are indistinguishable to the eye are being used in process plants. When facility and inspection staff replace components, they must be able to guarantee that the new part matches required specifications. Recent industrial accidents have cost the lives of workers and heightened the awareness of the need for accurate and comprehensive PMI inspections.
2.0 METHODS OF PMI
The XRF principle (x ray fluorescence) is one of the methods for PMI. Equipment used contains low radioactive sources (isotopes) or x-ray tubes. The exposed material reflects the radiation, generating energy. As every element has it’s own atomic structure, this reflection will generate a different energy level for every element. This energy is measured and detected, thus identifying the alloy elements.
The other method for PMI is Spark emission spectrography. Spectography is based on optical emission. The equipment consists of a probe which releases a spark that is used to vapourise the material being analysed. The atoms and ions in this vapour produce a spectrum which can be optically measured and then recalculated to determine the components of the material.
Material properties like structure difference and heat treatments have no influence on the results of the PMI measurements. However, it is important that the surface is identical to rest of the material. Oxides, coatings and dirt on the material will influence the identification results. Also the surface must be smooth. Elements that can be identified using PMI include: Ti, V, Cr, Mn, Co, Fe, Cu, Zn, Ni, Se, Nb, Mo.
Interesting to know is that the exposure of radiation is sufficiently low, so that extra safety measures are not required.
When dealing with exploitation licenses and preventive maintenance of technical installations, Non Destructive Testing and Examination (NDT / NDE) are indispensable techniques. NDT / NDE offer also the necessary guarantees when quality, expense saving, business security and safety is in order, for both existing and new installations. NDT / NDE decrease the risk of leakage or other defects, which increase the business integrity and safety within the installation and can save expenses.
3.0 XRF METHOD
The latest X – Ray Fluorescence (XRF) analysers which is one of the quickest and most comprehensive methods for Positive Material Identification where low level radiation is fired at the material and the energy levels reflected back from each element is measured, so identifying the alloy elements. XRF works by exposing the material to a flux of x-rays. The atoms then absorb the energy and become temporarily excited and they fluoresce, or emit x-rays.
The x-rays emitted by the sample’s atoms possess clearly defined energies that are unique to the elements present in the sample. By measuring the intensity and energy, the XRF instrument can provide qualitative and quantitative analysis. In other words, it can identify the elements, measure the concentration of each and display them on the unit. In using XRF, we can make Positive Material Identification. The data can be downloaded from the unit and saved for reference or creating reports.
The data and NDT software of the analysers has to comply with FDA 21 CFR Part 11, which is a requirement for many of the customers. The performance and capabilities of the XRF unit and a well laid procedure as per ASTM E 1476 procedure guarantee reliable and accurate results. PMI can be done on the shop floor to ensure that the documentation remains intact during the manufacturing process. A customer can also request a final PMI of the finished product, in which reports
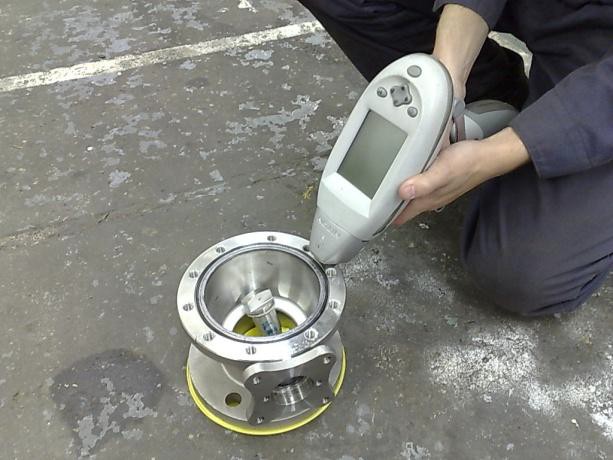
can be provided as part of the turn over package. This eliminates the need for any additional inspection, to insure that the material specifications have been met. PMI is also important for meeting the ASME Boiler and Pressure Vessel Code and the ASME Bio – processing Equipment Standard, which both require mill certifications and complete material traceability. Refer Figures 1 & 2.
4.0 USES
Today, many major oil companies require that every pipe, flange, connector, valve and welding seam in critical parts of the plant be measured to verify that materials match engineering specifications. In addition to compatibility issues, several other reasons can exist for material specification including design, corrosion resistance, and compliance to codes and standards such as ASME Boiler and Pressure Vessel Code. It also finds applications in the following areas.
Aerospace Manufacturing
- Aerospace Castings
- Aerospace Fastener QA / QC
- Failure Analysis
Pharmaceutical Manufacturing
- Component Validation
- Installation Qualification (IQ)
- Operational Qualification (OQ)
Electric Power Industry
- Plant Inspection
- Failure Analysis PMI
- Incoming Materials
- In Stock Materials
- In service Testing
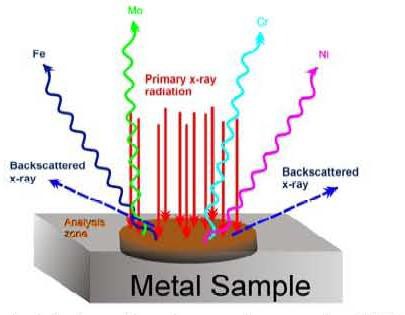
Figure 1 XRF ANALYSER

Figure 2 PMI Testing of Component using Hand Held Meter


Responses