An introduction to Eddy Current Testing theory and technology
Credit: Joseph M. Buckley
Introduction
Scope
This document is intended as a brief familiarisation course for Hocking NDT’s customers and sales representatives. It is not intended as a complete theoretical course in Eddy Current Non destructive testing and a number of aspects are intentionally simplified. The bibliography at the end of the document details several appropriate reference books which should be consulted if a more complete understanding is required
Historical Perspective
Eddy current testing has its origins with Michael Faradays discovery of electromagnetic induction in 1831. In 1879 Hughes recorded changes in the properties of a coil when placed in contact with metals of different conductivity and permeability, but it was not until the second world war that these effects were put to practical use in testing materials. Much work was done in the 1950’s and 60’s, particularly in the aircraft and nuclear industries and Eddy current testing is now an accurate, widely used and well-understood inspection technique.
Basic Electrical principles
Current flow in DC circuits
When a voltage is applied to a circuit containing only resistive elements current flows according to ohms law:
or V I. R
I V R
Electromagnetic Induction
In 1824 Oersted discovered that current passing though a coil created a magnetic field capable of shifting a compass needle. Seven years later Faraday and Henry discovered the opposite; that a moving magnetic field would induce a voltage in an electrical conductor.
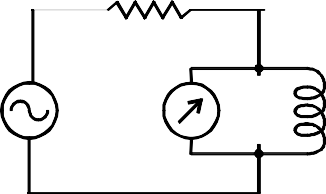
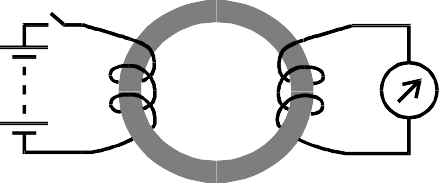
The two effects can be shown in a simple transformer connected to a DC supply as below
The meter needle will kick one way when current is applied then back the other way when it is removed. – A voltage is only induced when the magnetic field is changing
Such a voltage is also induced in the first winding, and will tend to oppose the change in the applied voltage.
The induced voltage is proportional to the rate of change of current.
A property of the coil called inductance (L) is defined, such that
Induced voltage L di
dt
If an AC current flows though an inductor the voltage across the inductor will be a maximum when the rate of change of current is greatest . For a sinusoidal wave form this is at the point where the actual current is zero,
If a circuit consists of more than one element the overall voltages, resistance and capacitance can be calculated by simple algebra, for example, with two resistors in series:


Current
Voltage
R1 R2
V1
V2
Vtot
Current (I) must be the same for both resistors, so: V1 =I.R1, V2=I.R2,
Vtot = V1+V2 = I.R1+ !.R2 = I (R1+R2) = I.Rtot
so Rtot = R1+ R2
Thus the voltage applied to an inductor reaches its maximum value a quarter-cycle before the current does – the voltage is said to lead the current by 90 degrees
The value of the voltage and current can be calculated from the formula
V I. XL
where XL is the inductive reactance, defined by the formula
XL 2 f L
where f is the frequency in Hz
Current flow in AC Circuits – Impedance
Basic Eddy Current Testing
R L Simple Coil above a metal surface
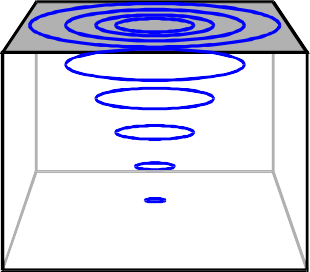
When an AC current flows in a coil in close proximity to a conducting surface the magnetic field of the coil will induce circulating (eddy) currents in that surface. The magnitude and phase of the eddy currents will affect the loading on the coil and thus its impedance.
![]()
VR
VL
Vtot
As we saw above, for series DC circuits calculation of total resistance is simply a matter of adding the individual resistance values.

![]()
![]()
![]()
For an AC circuit things are not so simple, but the same basic principles apply: The current though both elements must be the same, and at any instant the total voltage across the circuit is the sum of the values across the elements, however the maximum voltage across the resistance coincides with zero voltage across the inductor and vice versa.
![]()
V L As an example, assume that there is a deep crack in the surface immediately underneath the coil. This will interrupt or reduce the eddy current flow, thus decreasing the loading on the coil and increasing its effective impedance.
V R
V tot
![]()

![]()
![]()
![]()
We can represent this graphically using a Vector Diagram
This is the basis of eddy current testing, by monitoring the voltage across the coil in such an arrangement we can detect changes in the material of interest.
![]()
![]()
![]()
![]()
![]()
![]()
![]()
![]()
![]()
![]()
![]()
![]()
![]()
![]()
![]()
![]()
![]()
![]()
![]()
![]()
![]()
![]()
![]()
![]()
![]()
![]()
![]()
![]()
The Impedance of the circuit is therefore given by the formula
Z
XL R
2 2
and the phase angle between voltage and current is given by
 Note that cracks must interrupt the surface eddy current flow to be detected. Cracks lying parallel to the current path will not cause any significant interruption and may not be
sin1XL Z
detected
Crack parallel to eddy currents – not detected
![]()
Crack interrupts eddy currents – detected
Factors affecting eddy current response
A number of factors, apart from flaws, will affect the eddy current response from a probe. Successful assessment of flaws or any of these factors relies on holding the others constant, or somehow eliminating their effect on the results. It is this elimination of undesired response that forms the basis of much of the technology of Eddy current inspection. The main factors are:
Material conductivity
The conductivity of a material has a very direct effect on the eddy current flow: the greater the conductivity of a material the greater the flow of eddy currents on the surface.
Conductivity if often measured by an eddy current technique, and inferences can then be drawn about the different factors affecting conductivity, such as material composition, heat treatment, work hardening etc.
- Decreases with an increase in frequency
- Decreases with an increase in conductivity
- Decreases with an increase in permeability – This can be very significant – penetration into ferrous materials at practical frequencies is very small.
Permeability
This may be described as the ease with which a material can be magnetised. For non-ferrous metals such as copper, brass, aluminium etc., and for austenitic stainless steels the permeability is the same as that of ‘free space’, i.e. the relative permeability(r) is one. For ferrous metals however the value of r may be several hundred, and this has a very significant influence on the eddy current response, in addition it is not uncommon for the permeability to vary greatly within a metal part due to localised stresses, heating effects etc.
Frequency
As we will discuss, eddy current response is greatly affected by the test frequency chosen, fortunately this is one property we can control.
Geometry
Depth (mm) 100
10
Titanium Aluminium Copper
Steel
1
0.1
0.01
100Hz
1kHz
10kHz Frequency
100kHz
1MHz
Depth (in) 4
0.4
0.04
0.004
0.0004
10MHz
In a real part, for example one which is not flat or of infinite size, Geometrical features such as curvature, edges, grooves etc. will exist and will effect the eddy current response. Test techniques must recognise this, for example in testing an edge for cracks the probe will normally be moved along parallel to the edge so that small changes may be easily seen. Where the material thickness is less than the effective depth of penetration (see below) this will also effect the eddy current response.
Proximity / Lift-off
The closer a probe coil is to the surface the greater will be the effect on that coil. This has two main effects:
- The “lift-off” signal as the probe is moved on and off the surface.
- A reduction in sensitivity as the coil to product spacing
The graph above shows the effect of frequency on standard depth of penetration .
It is also common to talk about the “effective depth of penetration” usually defined as three times the standard depth, where eddy current density has fallen to around 3% of its surface value. This is the depth at which there is considered to be no influence on the eddy current field.
The impedance plane
Eddy current responses of a single coil may be conveniently described by reference to the “impedance plane”. This is a graphical representation of the complex probe impedance where the abscissa (X value) represents the resistance and the ordinate (Y value) represents the Inductive reactance.
increases.
Depth of Penetration
The eddy current density, and thus the strength of the response from a flaw, is greatest on the surface of the metal being tested and declines with depth. It is mathematically convenient to define the “standard depth of penetration” where the eddy current is 1/e (37%) of its surface value.
XL
Probe in
Ferrite
Crack in Steel
Steel
 MAGNETIC
Air
Titanium
![]()
![]()
![]()
![]()
![]()
![]()
![]()
![]()
![]()
![]()
![]()
![]()
NON-MAGNETIC
![]() Lift-Off
Lift-Off
Crack in Aluminium
Aluminium
Increasing conductivity of Test Sample
Copper
PROBE COIL IMPEDANCE – Z R
![]()
The standard depth of penetration in mm is given by the formula:
( f . r )
50
where is resistivity in .cm and f is frequency in Hz from this it can be seen that depth of penetration:
Note that, while the general form of the impedance plane remains the same, the details are unique for a particular probe and frequency.
The display of a typical CRT display eddy current instrument represents a ‘window’ into the impedance plane, which can be rotated and “zoomed” to suit the needs of the application. For example in the above impedance plane diagram a rotated detail of the “probe on aluminium” area would appear as below:
The characteristic “figure of eight” response as first one probe element, then the other, move over the defect. In general the closer the element spacing the wider the “loop” in the signal.
“cracks”
Lift-Off
![]()
![]()
Lift-off should be cancelled out assuming that the probe is perfectly balanced, but there will still be a “wobble” response as the probe is moved and tilted slightly.
This shows the display when moving over a series of simulated cracks of varying depths Note that, in the example shown both the amplitude and the phase of response from the different sized cracks varies.
Coil Configurations
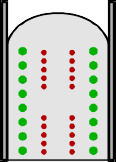
Reflection or Driver/pickup probes have a primary winding driven from the oscillator and one or more sensor windings connected to the measurement circuit. Depending on the configuration of the sensor windings reflection probes may give response equivalent to either an absolute or differential probe.
Appropriate coil selection is the most important part of solving an eddy current application, no instrument can achieve much if it doesn’t get the right signals from the probe.
Coil designs can be split into three main groups:
Surface probes used mostly with the probe axis normal to the surface, in addition to the basic ‘pancake’ coil this includes pencil probes and special-purpose surface probes
“Absolute” reflection probe
Main advantages of reflection probes are:
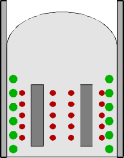 “Differential” reflection probe
such as those used inside a fastener hole.
Encircling coils are normally used for in-line inspection of round products, The product to be tested is inserted though a circular coil.
ID probes are normally used for in-service inspection of heat exchangers. The probe is inserted into the tube. Normally ID probes are wound with the coil axis along the centre of the tube.
These categories are not exhaustive and there are obviously overlaps, for example between non-circumferential wound ID probes and internal surface probes.
To this point we have only discussed eddy current probes consisting on a single coil, These are commonly used in many applications and are commonly known as absolute probes because they give an ‘absolute’ value of the condition at the test point.
Absolute probes are very good for metal sorting and detection of cracks in many situations, however they are sensitive also to material variations, temperature changes etc.
Another commonly used probe type is the ‘differential’ probe this has two sensing elements looking at different areas of the material being tested. The instrument responds to the difference between the eddy current conditions at the two points.
Differential probes are particularly good for detection of small defects, and are relatively unaffected by lift-off (although the sensitivity is reduced in just the same way), temperature changes and (assuming the instrument circuitry operates in a “balanced” configuration) external interference.
“cracks”
“wobble”
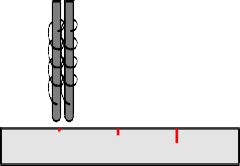
The diagram shows a typical response from a differential probe. Note:
Driver and pickup coils can be separately optimised for their
intended purpose.
Wider frequency range than equivalent bridge connected probes
The larger driver coil gives a more even field, resulting in better penetration and lift-off characteristics.
Typical Coil Connections.
Bridge
![]()
Differential Amplifier
Phase Sensitive Detector & balance circuitry
Main Amplifier
The two coils (Differential or Absolute plus balancing coil) form the ‘legs’ of a bridge. When the bridge is balanced the measured voltage will be zero, Any change in the condition of either coil will resulted in an unbalanced bridge, the degree of imbalance corresponds to the change in coil impedance.
Driver pickup.
![]()
![]()
![]()
Differential Amplifier
Phase Sensitive Detector & balance circuitry
Main Amplifier
As can be seen the essential elements are the same for a driver/pickup configuration as for a bridge, the necessary changes can be achieved by simple switching or probe connection changes.
Practical Testing
Any practical Eddy current test will require the following:
- A suitable probe
- An instrument with the necessary capabilities.
- A good idea of size, location and type of the flaws it is desired to find
- A suitable test standard to set up the equipment and verify correct operation
- A procedure or accept/reject criteria based on the above.
- The necessary operator expertise to understand and interpret the results.
Typical Instrumentation
There are a number of basic groups of eddy current instrumentation
Special purpose equipment:
Coating thickness meters, conductivity meters (e.g. Hocking AutoSigma) Generally designed to give a digital readout without the operator needing to understand much about the internal technology, except as needed to give reliable test conditions)
“Crack detectors”
fairly simple equipment, generally operates at a restricted number of frequencies typically several hundred kHz, Meter or Bar-graph display. Suitable for surface crack detection and simple sorting applications only. e.g. Hocking Locator and QuickCheck
Normally have some means of compensating for lift-off (e.g. phase rotation and/or fine frequency adjustment) so that only crack-like indications give a reading on the meter or bargraph. An alarm threshold is usually included.
Portable impedance plane Eddy current Flaw detectors
Give a real impedance plane display on a CRT or other electronic display (LCD, plasma etc.) Generally have fairly extensive capabilities: Wide frequency ranges from around a hundred hertz to several megahertz, extensive alarm facilities, general-purpose units may have rate filtering (see below) some instruments may be capable of multifrequency operation, allowing combination of results at two or more test frequencies in order to reduce or eliminate specific interfering effects.
“Systems” eddy current units.
Intended for factory operation, often in Automatic or Semi-Automatic inspection machines. Generally similar operation to impedance plane portables but usually have extensive input and output facilities such as relays and photocell inputs. May be custom built for a specific purpose, in which case features not needed for the intended application are often omitted.
Meter/CRT Instruments Typical examples (simplified). Hocking NDT Locator UH
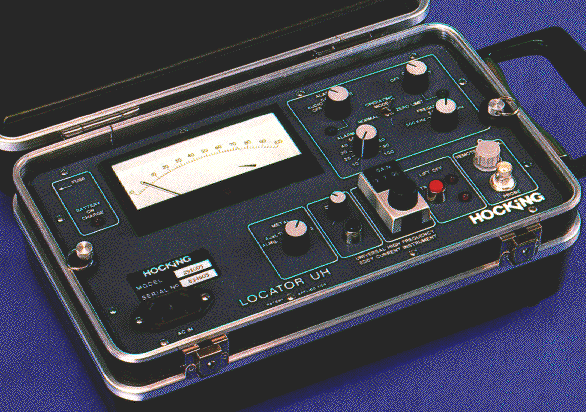
Typical Application:
Surface crack detection in aircraft parts using absolute probe.
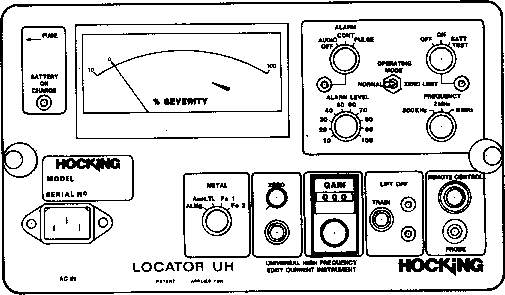
Controls
Meter display indicates ‘crack severity’ – imbalance from zero point.
Zero – balance internal circuitry
Zero Offset – shift zero point, useful for sorting/material verification applications.
Train – zero and set lift-off compensation circuitry.
Frequency – choice of three operating frequencies: 500kHz for Aluminium and carbon steel,
2 MHz for small cracks in Al + Stainless & carbon steels, 6 MHz for low conductivity Alloys, Titanium etc.
Metal type – optimises lift-off compensation circuitry and adjusts sensitivity to match response curves from particular metals.
Alarm Level – sets meter indication at which the alarm will light/sound.
Phasec 1.1
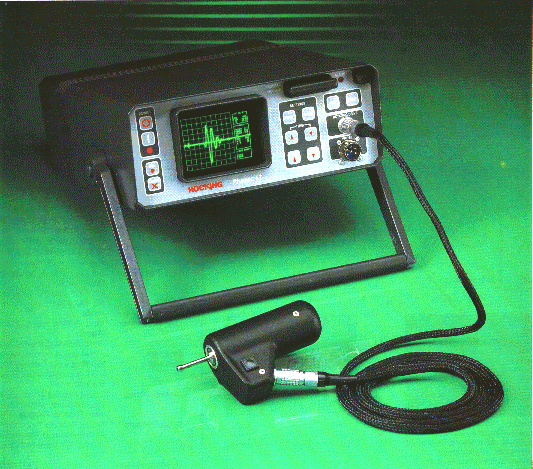
Typical Applications:
Surface crack detection, weld inspection, bolthole inspection with rotating probe drive, metal sorting, tube inspection etc. etc.
Controls:
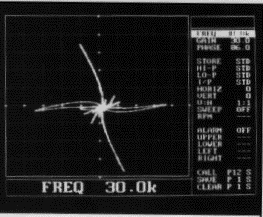
Single buttons for
Zero, Screen clear, print, Menu commands for
Frequency, Gain, Phase, Display storage persistence, High and low pass filters, Preamplifier sensitivity, Spot position, Timebase, Rotating drive speed and Alarm parameters.
also facilities for internal trace and parameter storage and printing, computer interfacing etc.
Operating frequency
Selection of operating frequency is the primary eddy current test parameter under operator control. Frequency selection affects both the relative strength of response from different flaws and the phase relationship, Thus selection of operating frequency is very important in obtaining good resolution of
flaw signals in the presence of other variables which may affect the test.
Applications
Surface crack detection.
Normally carried out with pencil probes or ‘pancake’ type probes on ferrous or non-ferrous metals. Frequencies from 100 kHz to a few MHz are commonly used. Depending on surface condition it is usually possible to find cracks as small as 0.1 mm or so deep.
Differential probes are sometimes used, particularly in automated applications, care must be taken to ensure that the orientation of flaws is correct for detection.
Non-ferrous metal sorting
This is essentially conductivity testing and for dedicated applications a conductivity meter may be a better choice. From the impedance plane diagram it will be seen that the indication from a conductivity change is essentially the same as from a crack, and both meter and impedance plane type crack detectors can be successfully used to sort similar metals using a suitable absolute probe. It should be remembered that widely different metals may have similar conductivity and that the allowable values for similar alloys my overlap, so conductivity measurement should only be used as an indication that a metal is of correct composition or heat-treatment.
Sub-surface crack/corrosion detection.
Primarily used in Airframe inspection. By using a low frequency and a suitable probe eddy currents can penetrate aluminium or similar structures to a depth of 10mm or so, allowing the detection of second and third layer cracking, which is invisible from the surface, or thinning of any of the different layers making up the structure.
Heat exchanger tube testing
Heat exchangers used for petrochemical or power generation applications may have many thousands of tubes, each up to 20m long. Using a differential ID ‘bobbin’ probe these tubes can be tested at high speed (up to 1 m/s or so with computerized data analysis.) and by using phase analysis defects such as pitting can be assessed to an accuracy of about 5% of tube wall thickness. This allows accurate estimation of the remaining life of the tube allowing operators to decide on appropriate action such as tube plugging, tube replacement or replacement of the complete heat exchanger.
The operating frequency is determined by the tube material and wall thickness, ranging from a few kHz for thick-walled copper tube up around 600 kHz for thin-walled titanium.
Tubes up to around 50mm diameter are commonly inspected with this technique. Inspection of ferrous or magnetic stainless steel tubes is not possible using standard eddy current inspection equipment.
Dual or multiple frequency inspections are commonly used for tubing inspection. In particular for suppression of unwanted responses due to tube support plates.. By subtracting the result of a lower frequency test (which gives a proportionately greater response from the support) a mixed signal is produced showing little or no support plate indication, thus allowing the assessment of small defects in this area.
In-Line inspection of Steel tubing
Almost all high-quality steel tubing is eddy current inspected using encircling coils . When the tube is made of a magnetic material there are two main problems:
- Because of the high permeability there is little or no penetration of the eddy current field into the tube at practical test frequencies.
- Variations in permeability (from many causes) cause eddy current responses which are orders of magnitude greater than those from defects.
These problems may be overcome by magnetically saturating the tube using a strong DC field. This reduces the effective permeability to a low value, allowing effective testing.
Tubes up to around 170mm diameter are commonly tested using magnetic saturation and encircling coils.
When tubes are welded this is usually where the problems occur, and so welded tubes are commonly tested in-line using sector coils which only test the weld zone.
Ferrous weld inspection
The geometry and heat-induced material variations around welds in steel would normally prevent inspection with a conventional eddy current probe, however a special purpose “WeldScan” probe has been developed which allows inspection of welded steel structures for fatigue-induced cracking, the technique is particularly useful as it may be used in adverse conditions, or even underwater, and will operate through paint and other corrosion-prevention coatings.
Cracks around 1mm deep and 6mm long can be found in typical welds.
Instrument set-up
While the precise details of setting up an instrument will vary depending on the type and application the general procedure is usually the same, obviously one the application has been tried the required values for many test parameters will be known, at least approximately,
Connect up the appropriate probe and set any instrument configuration parameters.(mode of operation, display type etc.)
Set the frequency as required for the test. Set gain to an intermediate value,
Move the probe on/on/over the calibration test piece and set phase rotation as desired (e.g. lift-off or wobble horizontal on a CRT)
Move over the defects and adjust gain (and horizontal/vertical gain ratio if fitted) to obtain the desired trace size/meter indication. It may be necessary to re- balance after changing gain.
Further optimise phase rotation as required.
Use filters etc. to further optimise signal to noise ratio. Set alarms etc. as required.
Run over the calibration test piece again and verify that all flaws are clearly detected.
Perform the test, verifying correct operation at regular intervals using the calibration test piece.
Rate Filtering
Most eddy current tests involve movement. Therefore the indications obtained will vary with time in a way which is fairly consistent (assuming the movement is regular) and which can be interpreted in terms of the speed of probe movement over various discontinuities.
For example, if an absolute probe with diameter 2mm moves over a narrow crack at a speed of 1 m/s the resulting indication will last for approximately 2 milliseconds. If the material composition or thickness is also varying gradually over a distance of say 50 cm the indication from this will change much more slowly. Therefore a high-pass filter set to a frequency around 100Hz or so will pass the rapidly changing signal from the defect but not the slower indication from the material changes.
Unfiltered Signal
High-pass filtered Signal
Effect of rate filtering on defect resolution
Bibliography
There are a number of excellent books available on eddy current testing. Many are available from ASNT or other national institutes.
The following are particularly recommended to ‘fill in’ if a more complete understanding is required.
Fundamentals of eddy current Testing, Donald J. Hagemaier, ASNT, 1990 ISBN 0-931403-90-1
Advanced Manual For: Eddy Current Test Method CAN/CGSB-48.14-M86,
Canadian General Standards Board
NDT Handbook 2nd Edition Volume 4 b, Electromagnetic Testing,
Ed. Paul McIntyre/Mike Mester, ASNT, 1986 ISBN 0-931403-01-04


Responses