Radiography
Welcome to [NDT Inspection Portal]’s industrial radiography (RT) group, a place for professionals... View more
What is Radiography RT?
What is Radiography RT?
X-ray inspection (RT) is the most popular non-destructive inspection technique (NDT) because of its versatility in detecting a wide range of defects in multiple materials and its ability to create a permanent record of inspections.
There are numerous types of RT techniques, including conventional X-rays and various forms of digital X-ray examinations. X-ray inspections are a widely accepted method of non-destructive testing (NDT), as they can detect defects such as cracks, thickness variations, corrosion and material degradation with astonishing precision.
Conventional X-rays use a sensitive film that reacts to emitted radiation to capture an image of the part to be inspected. X-rays and gamma rays are used to produce X-ray samples showing thickness changes to detect defects in surface volume.Radioactive isotopes are used as a radiation source in an X-ray machine.
Gamma radiation sources such as iridium-192 and cobalt-60 are used to study a variety of materials. X-ray techniques use different types of beams to penetrate a product, such as X-rays and gamma rays.
X-ray inspection methods are well suited for detecting material defects in industrial plants and applications and are used to identify problems with production facilities, equipment and applications in the oil and gas industry.The vast majority of industrial X-rays are for testing and sorting welded and pressurized pipelines, pressure vessels, high-performance vessels, pipeline castings, forgings, ceramics, electronic components and ammunition components where defects cannot readily be tolerated. Medical examinations are non-destructive, but industrial X-rays produced by high-vacuum tubes are an important area.
X-ray inspection (RT) is a non-destructive method of inspection (NDE) in which X-rays and gamma rays are used to examine the internal structure of a component.Radiography uses X-rays because they can be used in X-ray tubes, while Gamma rays with radioactive isotopes are used to examine the inside surface of an object for imperfections that could cause damage. RT is a non-destructive testing method (NDT) that uses X-rays and gamma rays to examine internal structures of the manufactured components to detect faults and defects.
Single-wall X-rays are a technique in which radiation is passed through a wall of welded material to be viewed on an X-ray. Material-welded component techniques use radiation to pass through two wall-welded materials that are filmed on a side wall for X-ray inspection. X-ray examinations test parts placed between the radiation source and the film detector.
It is usual to place films in industrial X-rays to clean the area where work is done, and to add a screen to the collimator to reduce the size of the area exposed to the source.
Available industrial X-ray films can be used in accordance with the SE-1815 ASTM standard for test methods and film systems for industrial X-ray imaging.The recommended minimum thickness limit can be reduced by X-ray tests, which are used to prove the required X-ray sensitivity and obtain the buyer’s consent.
The LED letters AFA are placed next to the penetrameter (s). This method is used to create a permanent X-ray identification that can be traced back to the component by welding the seams and part numbers if necessary.
X-rays are best used to access the sides of welds, with the exception of double-walled signal imaging techniques used in pipe work.Ultrasonic tests on ferrous and non-ferrous materials are well suited for testing thick sections accessible only from one side to detect fine lines and clearer defects that cannot be detected by X-rays.
The inspection of X-ray and ultrasonic welds are two of the most common non-destructive testing methods (NDT) that are used to detect discontinuities in the internal structure of welds. Non-destructive testing enables them to test, test and evaluate welded structures for discontinuity without destroying the welded structure. The most obvious advantage of X-ray or ultrasonic welding inspection is its ability to create an internal integrity of the welds without destroying their components.
Radiography is another useful method of non-destructive testing that you can learn more about as you advance your welding program. Film radiography is the oldest non-destructive testing method (NDT) and remains one of the most important and widespread forms of industrial inspection. In industrial radiography, non-destructive testing uses ionizing beams to examine materials and components with the aim of locating and quantifying defects and degradation of material properties that could cause the failure of a technical structure.Nevertheless, X-ray examination has made great progress since the beginnings of film and X-rays, and modern computerized and digital technologies have changed the way X-rays do their work.
Computed tomography (CT) is an advanced radiological test method in which an automated detector in motion collects thousands of images from different angles to create a 3D image.Computer X-ray imaging (CR) uses phosphorus imaging plates to replace the film in conventional X-ray techniques. Computed tomography is a CT technique that captures and superimposes hundreds of thousands (depending on size and components) of 2D X-ray scans to create 3D X-ray images.
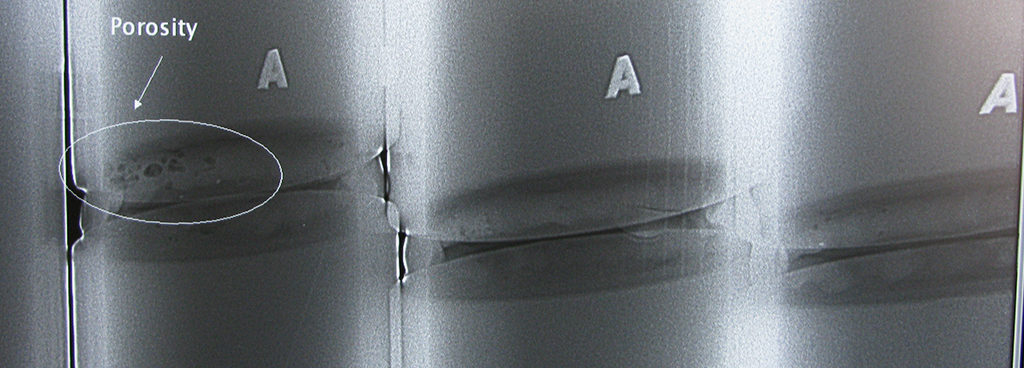
The basic principles of X-ray inspection of welds are the same as in medical X-ray inspection. As described above, this shape uses radiation-sensitive film to capture images of the inner welds of a good structure. The digital x-ray image shows the image of the weld interior on a computer screen.
Sorry, there were no replies found.
Log in to reply.