Introduction to Magnetic Particle Testing
Magnetic Particle Testing
Magnetic particle testing is a non destructive testing method for detection of surface and near surface discontinuities in ferromagnetic materials.
Ferromagnetic materials are materials that can be magnetized to a level that will allow the inspection to be effective. They are,
Iron, Cobalt, Nickel and their magnetic alloys.
Magnetic particle testing can detect, surface and near surface cracks seams, laps, cold shuts in castings, laminations, lack of fusion near the surface, undercuts, deep scratches and fatigue cracks are indicated. Linear inclusions and porosity at or very near the surface may produce indications.
The technique uses the principle, that during the magnetization of a ferromagnetic material, magnetic lines of force [ magnetic flux lines ]
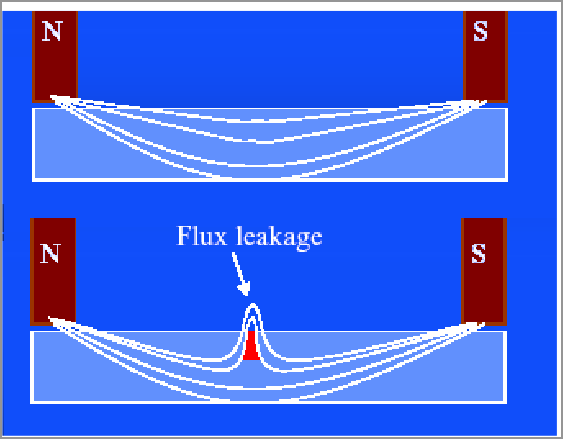
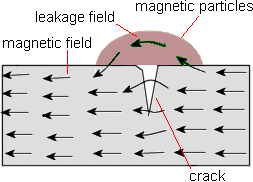
pass through this magnetically conducting medium. If the magnetic flux lines hit an area of different magnetic permeability such as a crack near the surface, a portion of these flux lines gets diverted and leak out above the surface of the material. A magnetic leakage field emerges from the part.
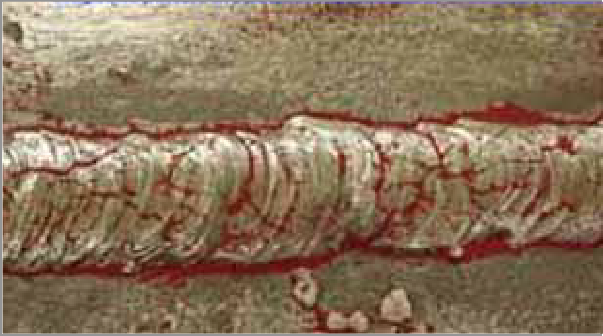
To show this leakage field, colored finely divided iron particles are sprayed to the area under examination. The leakage field attracts and accumulates some of these iron powder particles and essentially creates a powder caterpillar worm – like visual indication for the human eye. The indication is produced directly on the surface of the part and above the discontinuity.
There are variations in the way the magnetizing field is applied, but they are all dependant on the above principle.
All surface and near surface crack like defects which produces a leakage field at the test surface can be detected. No elaborate precleaning is necessary, and surface defects filled with foreign material can be detected.
Characteristics of a discontinuity that enhances its detection are, Its depth is at right angles to the surface
Width of the surface opening small, so that the air gap created Is narrow
Its length at the surface is large with respect to its width
It is comparatively deep in proportion to the width of its opening.
In general reliable detection requires that the width – depth – length dimensions of the discontinuities correspond to the ratio 1 : 5 : 10. The lowest detection limits are a 1µm crack width, with a 10 µm depth of cut.
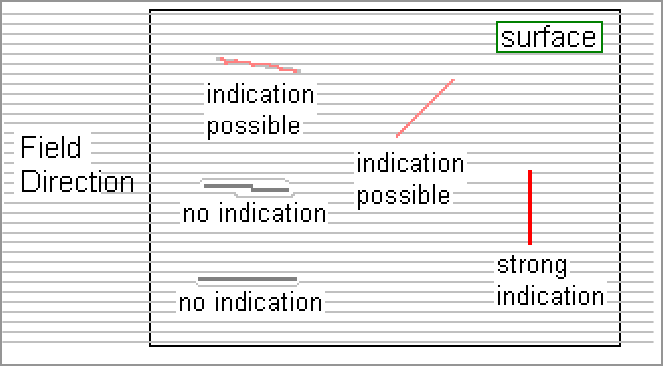
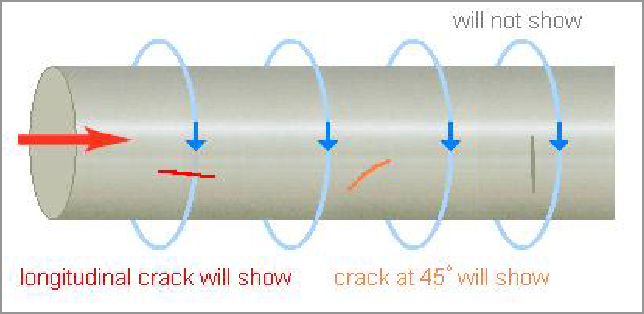
Optimum crack detection occurs when the magnetic flux lines flow at right – angles to the length of the defect. To form a detectable leakage field, the angle between the field direction and the expected defect’s length shall not be greater than 450 .
Disadvantages : It can be used only on ferromagnetic materials, has certain application which require large amounts of electrical current and requires the magnetic field to be properly oriented in relation to the discontinuities
anticipated. Paint coatings and nonmagnetic coverings affect the sensitivity of examination. Demagnetization of the parts following examination may be required. Post cleaning to remove the magnetic particle materials from the test surface is required.
Detectability of Defects : Detectability depends on formation of a strong leakage field which is dependent on surface opening of the discontinuity and its depth through the part thickness. A shallow surface scratch which may be as wide as it is deep, usually does not produce an indication. If a crack is wide open at the surface, the reluctance of the air gap in the
crack opening reduces the strength of the leakage field. This, combining with the inability of the particles to bridge the air gap, fails to form an indication. Laps emerge at an acute angle to the surface and a wide air gap is created between its lip and the part surface. The leakage field may be
quite weak because very little leakage flux takes the path out through the surface lip of the lap to cross this high reluctance gap. If the faces of a crack are tightly forced together under compressive stress, the almost complete absence of an air gap may produce so little leakage field that no particle indication is formed.
The surface structure of a test piece has a significant influence on the detectability of defects. The surface cutting depth of a defect should be at least twice the associated surface roughness. Defect detectability can be further reduced by false indications arising from magnetic stray fields, accumulation of powder due to surface roughness, part configuration, scratches, scales, slots etc.
Cases can occur where It is difficult to generate the force required for a positive defect indication.
Surface irregularities and scratches can give misleading indications. Therefore it is necessary to ensure careful preparation of the surface before magnetic particle testing is undertaken.
Detectability of Sub Surface Defects : Magnetic particle testing can detect near –
surface discontinuities of favorable position and adequate size, but the possibility of an indication rapidly decreases when the discontinuity is more than .2 mm below the surface.
Detection sensitivity increases with increase in magnetic field strength, but with very high field strength magnetic particles will be attracted to defect free areas of the surface as well as to defects. The depth below the surface at which a sub surface defect may be detected is of the order of 3 to 7 mm when direct current magnetization is used, but this will also depend on the size, shape and orientation. Therefore, the deeper the discontinuity lies below the surface, the larger it must be to yield a readable indication and the more difficult the discontinuity is to find by this method.

Cracks below a non magnetizable surface layer up to 40 µm are detectable.
Circular and Longitudinal Magnetic fields :
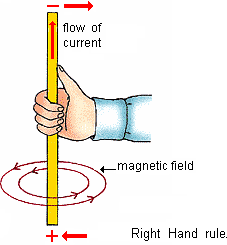
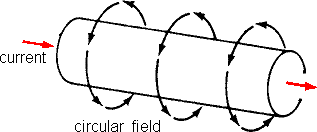
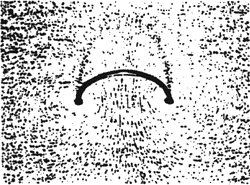
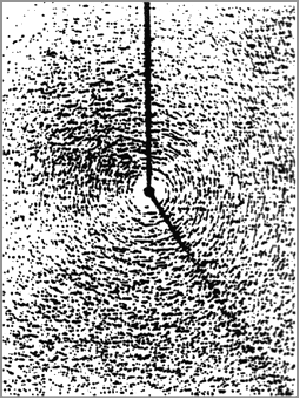
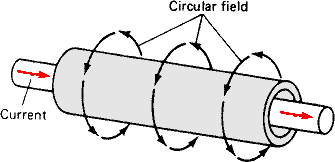
Circular field : When an electric current is passed through a conductor, a circular magnetic field is produced that is approximately perpendicular to the direction of current flow in the part. This magnetic field has directional properties which depend on the direction in which the current is flowing.
A simple rule for determining the direction of the magnetic field in and around a conductor, is to grasp the conductor in the right hand with the thumb pointing in the direction of the current flow.
The fingers then point in the direction taken by the magnetic lines of force in the magnetic field surrounding the conductor. This is known as the right – hand rule.
[ current flows from Positive terminal to the Negative terminal ] The strength of the magnetic field in and around a magnetic or non magnetic conductor is directly proportional to the strength of the current flowing through it, doubling the current doubles the magnetic field strength.
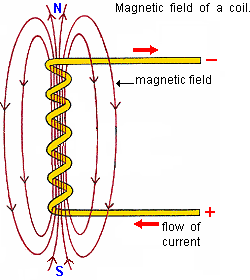
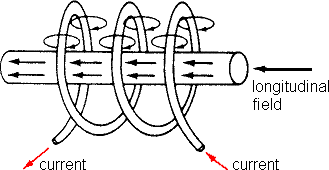
Longitudinal fields : When a current carrying conductor is bent into
a single loop, the circular magnetic flux field surrounding the conductor pass through the loop opening. The magnetic field within the loop has a definite direction, one side of the loop will be a
north pole while the other side will be a south pole.
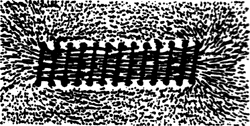
If the conductor is looped a number of times, a coil is formed and each individual turn produces its own associated circular
magnetic field. These fields add together to form a combined
stronger longitudinal field around and through the coil.
The strength of the longitudinal field passing through the interior
of a coil is proportional to the product of the current, I, in amperes and the number of turns, N, and is expressed as Ampere – Turns. Therefore, the magnetizing force of such a coil can be varied by changing either the current or the number of turns in the coil.
Coils and yokes produce longitudinal magnetization.
Vector Fields : When two magnetizing forces are imposed simultaneously in the same part, a vector field is formed which is the resultant direction and strength of the two imposed fields.
Continuous Method : With this method, the magnetizing current remains “on” during the application of particles, removal of excess particles and performance of the examination. The current may be continious or it may be applied as a series of short shots. The continious method is sensitive and will give indications of fine defects. Soft materials of low retentivity must be tested by this method. Most of the examinations are performed by this method. Residual Method : With this method, a part is magnetized, the field removed and then the magnetic particles applied and inspection carried out. It has the advantage that inspection may be made away from the magnetizing equipment. This method is applicable with parts which retains some magnetic field after the magnetizing field is turned off. This method is less sensitive than continuous method but non relevant indications are reduced and indications are easily interpreted.
Magnetizing field strength : The strength of the magnetizing field is is a factor affecting sensitivity of examination and recommended magnetizing field strength is 2400 amp / meter or 30 g or .72 tesla
and above. Test sensitivity also depends on, size, shape and
general characteristics of the particles used and the nature of the carrier fluid for these particles.
cont
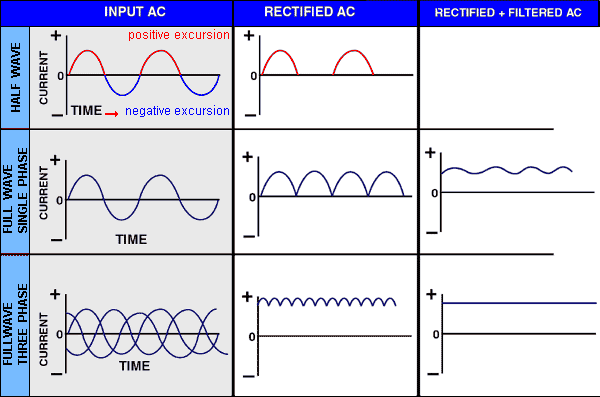
Magnetizing Currents : Electric current is mostly used to establish the magnetic field in components during magnetic particle inspection. Alternating current and rectified direct current are the two basic types of current commonly used. Current from single phase 110 volts to three phase 440 volts AC are used to derive the magnetizing current. High magnetizing currents can be obtained by the use of a step – down voltage transformer.
The type of magnetizing current has significant effect on inspection result.
Direct Current : Direct current flows continuously in one direction at a constant voltage. A battery is the most common source of direct current. Direct current generates a magnetic field that penetrates deeper into the material and is desirable when performing inspection in search of defects below the surface.
Alternating Current : high voltage alternating current is the source of electric current power to the industries which is reduced to the required voltage level using a transformer. Alternating current reverses in direction at a rate of 50 or 60 times per second. If alternating current is used, the magnetic field generated within the work piece is largely confined to the area that is close to the material surface. This is known as Skin Effect. Therefore, alternating current is recommended only when the inspection is limited to surface defects. The advantage of using alternating current is that, it is highly sensitive for detection of surface defects such as fatigue cracks and it is easy to demagnetize the work piece after test by gradually reducing the current level or magnetic field to zero.
Rectified alternating currents : The skin effect limits the use of alternating current, since many inspection applications call for the detection of sub surface defects. Hence, alternating current is converted to one – directional current that is very much like direct current, through the process of rectification.
Half wave rectified direct current [ HWDC ] : When single phase alternating current is passed through a rectifier, current is allowed to flow in only one direction. The reverse half of each cycle is blocked out, so that a one directional, pulsating direct current is produced. The current rises from zero to a maximum and then returns to zero. No current flows during the time when the reverse cycle is blocked out, hence the amperage is half of the unaltered current.
HWDC has the penetrating characteristics of direct current. The pulsating nature of HWDC helps formation of magnetic particle indications by vibrating the particles and gives them additional mobility. This added mobility is very important when using dry particles for the inspection. The pulsation is reported to significantly improving detection sensitivity.
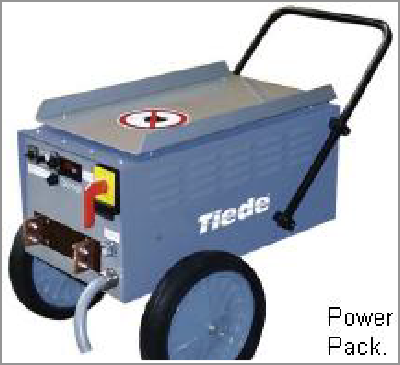
HWDC with dry powder is considered the best combination for subsurface defect detection. For this reason, HWDC is a primary power source for welds and casting inspection. HWDC can also be used with a wet particle suspension to provide good sensitivity for revealing fine surface cracks. Since HWDC will leave a part in a partially magnetized state, it is usually packaged as an AC / HWDC combined unit so that the AC is available for demagnetization. Portable units with up to 3000 amps current is available.
 Full Wave rectified direct current [ FWDC, single phase ] : Full rectification inverts the negative current to positive current rather than blocking it out. This produces a pulsating direct current with no interval between the pulses. Filtering is usually performed to soften the sharp polarity switching in the rectified current. While
particle mobility is not as good as half wave rectified current due to reduction in pulsation, the depth of the subsurface magnetic field is improved. Reduced particle mobility makes this current less suitable for use with dry particle inspection.
Three phase full wave rectified direct current [ FWDC, three phase ] : Three phase alternating current is rectified to power high current mobile and stationery magnetizing units, because it has more favorable power transmission and line loading characteristics. This current is normally used in units that provides more than 3000 amperes of current. Three phase power requires a bridge rectifier in each of the three phases. When it is rectified and filtered, the resulting current very closely matches the DC output of a battery. Reduced particle mobility makes this current less suitable for use with dry particle inspection.
Leakage Field :
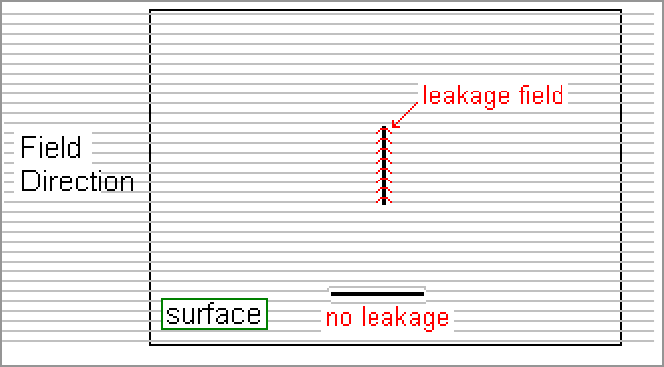
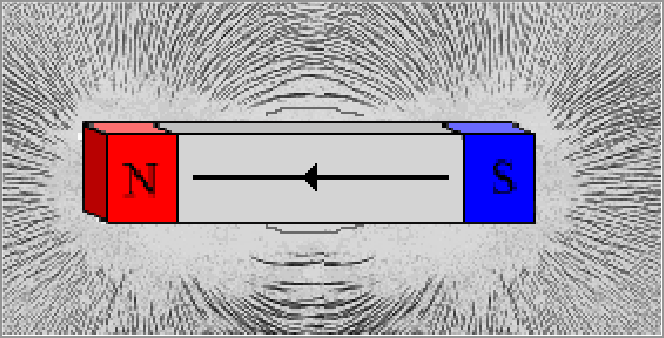
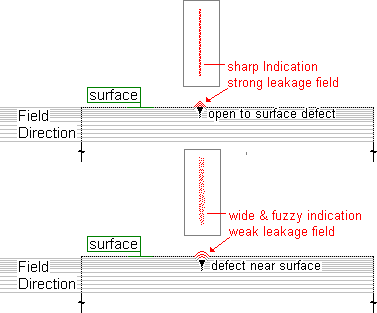
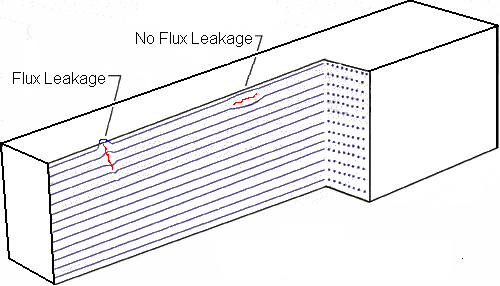
Leakage fields are the basis for magnetic particle examination. A leakage field are the flux lines in the air surrounding a discontinuity in a magnetized part.
a
The leakage field which develop at and above the surface of a magnetized material attracts and accumulates iron particles which forms a visible indication on the surface.
A bar magnet has a pole at each end. They are, a North pole and a south pole. Magnetic lines of force flow through the bar from the south pole to the north pole. Because the lines of force within the bar magnet run the length of the bar, it is said to be longitudinally magnetized.
If the magnet is cracked at right angle to the length but not broken completely in two, a north and a south pole form at opposite edges of the crack and a leakage field emerge. This leakage field attracts iron particles that outlines the crack.
Surface Discontinuity : When a part is magnetized such that the direction of the magnetic lines of force is at right angles or nearly right angles to the length of a surface breaking discontinuity, the flux lines are bend into the air above the crack. This bending is caused by the change from high permeability of the magnetic material to the low permeability of air in the gap of the crack. The leakage field spans the narrow air gap throughout the length of the discontinuity.
When fine iron particles are applied to the surface, the particles are attracted to the poles of this miniature leakage field. The first layer of particles shorten and strengthen the leakage field causing additional particles to be attracted.
These particles attract more particles until the entire leakage field is filled with chains of tightly held magnetized particles. A surface breaking discontinuity forms a sharply defined indication.
Near surface Discontinuity : When the discontinuity is near the surface, some of the bent lines of force complete their path within the metal above the discontinuity. Others that complete their bent path in the air form a leakage field that is broader and weaker than the leakage field for a similar surface breaking discontinuity. Thus, the attracted particles which accumulate at the leakage field of a near surface discontinuity are more loosely held. The indication looks wide and fuzzy. For a deep discontinuity, all of the bent lines of force complete their path within the metal above the discontinuity, as a result no leakage field emerges from the part.
Orientation : The direction of magnetic flux must be at right angles to the length of any discontinuity to produce the strongest indication of that discontinuity.
When the lines of force are parallel to the length of a
discontinuity, they follow the metal path along the edges of that discontinuity, rather than span the long direction of the air gap. The result is that no leakage field is created, and in tern no magnetic indication is produced to reveal that discontinuity.
Induced current magnetization :
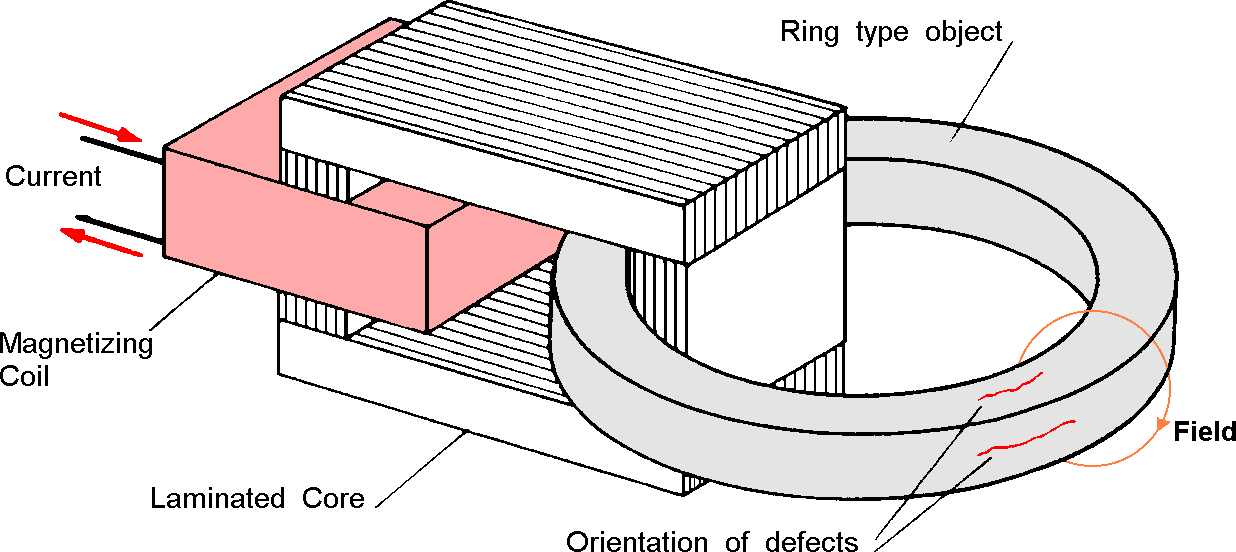
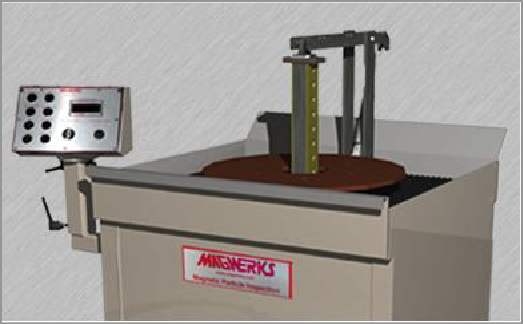
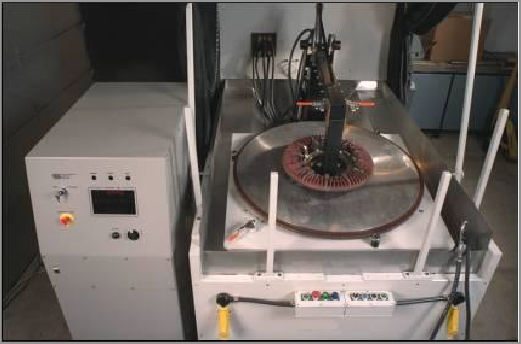
Induction is a magnetizing technique based upon transformer principle. An alternating current is made to flow in a ring- shaped specimen by effectively making it the secondary winding in a transformer set up. Since the specimen is a short circuit single turn, very high current flows through it.
A coil and a pre-formed laminated core form the primary section and the ring shaped work piece surrounding the core forms a short circuit secondary winding. In accordance with the induction law, the current carrying primary coil induces a circulating current in the secondary, i. e. the work piece. Like a current carrying conductor the circular field associated with this current takes the form of a toroidal magnetic field that encompasses all surface areas on the ring. All circumferential defects in the ring shaped work piece can therefore be detected.
The magnetizing flux achieved is difficult to calculate because of the unknown efficiency of the transformer coupling, and is usually measured on a test piece with a clamp – round meter, which measures the current flow.
The choice of magnetizing current for the induced-current method depends on magnetic properties of the part to be inspected.
Passing an alternating current through a conductor will set up a fluctuating magnetic field as the level of magnetic flux rapidly changes due to the current fluctuation. The alternating induced current in conjunction with the continuous method renders applicable for processing magnetically soft, or less retentive parts.
Quick Break : For retentive parts, such as for most bearing races or similar parts having high magnetic retentivity, direct current is used for magnetization. The current generates strong magnetic field in the laminated core which passes through the ring. When the current is broken, by a quick break circuitry results in a rapid collapse of the magnetic flux and the generation of a high amperage. Thus the part is residually magnetized with a toroidal field, and subsequent application of magnetic particles will produce indications of circumferentially oriented discontinuities in all surfaces in one operation. This method is used for inspection of hollow circular parts, such as, spacers, rings, discs etc when looking for discontinuities lying in a circumferential surface.
Transient current : When a bar is longitudinally magnetized, the field at the end of the bar is not truly longitudinal, and does not indicate transverse discontinuities at the ends of the bar. Direct current in the magnetizing coil, suddenly broken, induces a heavy circular current in the extreme outer layers of the metal, which extends to the very ends of the bar. This provides a longitudinal field to indicate transverse discontinuities in such critical areas.
Current Flow Techniques :

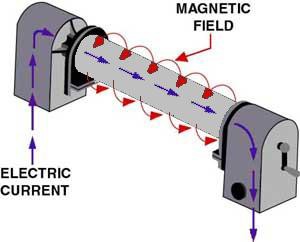
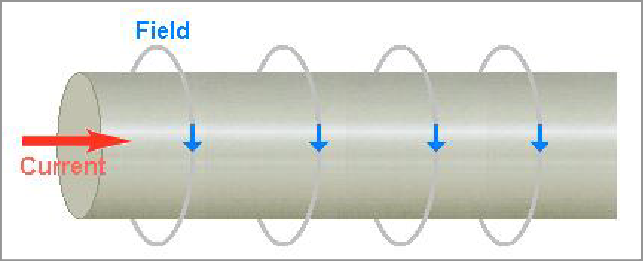
Direct current flow method may be used when detecting discontinuities at or near the outer surface of the part. The magnetizing current should be applied for a duration of .5 to 2 seconds with a minimum of two shots. In order to indicate the presence of all discontinuities, at least two separate examinations shall be performed on each area. During the second examination, the flux lines shall be directed approximately perpendicular to those used during the first examination. A different technique for magnetization may be required for the second examination.
Head shot method :
Direct electrical contact at each end of a component, so that the current passes through the whole part is a rapid and reliable method which is very suitable for the inspection of relatively small solid components. This is done by clamping the ends of the part between the contact heads, generally on a stationary horizontal bench unit that incorporates the source of the current. The contact heads must be constructed so that the surfaces of the part are not damaged, either physically by pressure or structurally by heat from arcing or from high resistance at the points of contact. The current flow is uniform and passes through the entire piece being examined. The circular field thus established around the test part will develop leakage field across defects which lie along the same direction as the connecting line between the contact heads. Strongest indications are produced by discontinuities that are parallel to the direction of current flow. The size and shape of the part will determine whether another magnetic field, perpendicular to the previous direction can be generated in the test part by this method.
The current to be passed through the part is based on the diameter or cross section area of it. The flux density is inversely proportional to the cross sectional area of the test
part. To achieve adequate field strength for locating surface and sub surface discontinuities, direct or rectified current is used.
For round parts, current to be applied is 12 to 31 amps per mm of outer diameter including any hollow portion.
Alternating current can be used at half of the above current for detection of surface discontinuities only.
For parts with geometric shapes other than round, the greatest cross sectional diagonal in a plane at right angles to the current flow should determine the inches to be used in current computations.
For oddly – shaped uniform cross section parts, the following formula may be used to compute the current required for direct current, direct contact magnetization,
Current in Ampere DC = [ P / 3.14 ] X 1000. Where P is perimeter of cross section.
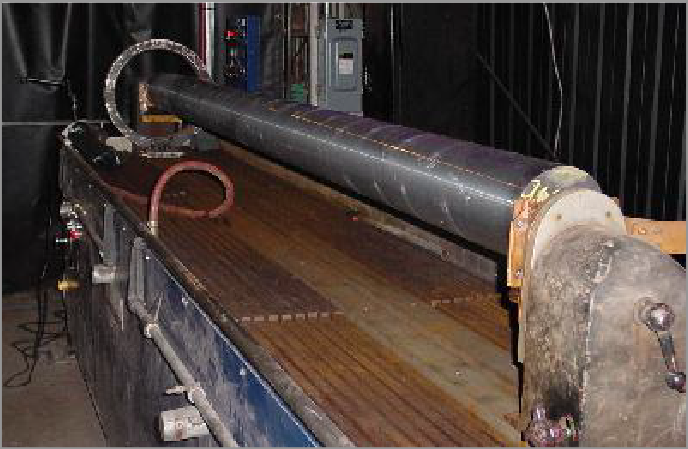 Stationary Horizontal Units : The general purpose unit has a built in tank that holds the particle suspension and contains a bath pump, which continuously agitates the bath and supplies the liquid through an adjustable hose to be applied to the test part surface.
Pneumatically operated contact heads, together with a rigid type coil, provide capabilities of both circular and longitudinal magnetization of the test part. Self contained AC and rectified AC power supplies are available in amperage ratings from 2500 to 10000 Amps. Maximum opening between contact heads varies from 1 to 12 feet. Other options are curtains or hoods and ultraviolet light for examination with fluorescent particles.
Coil Magnetization :
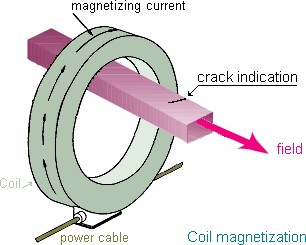
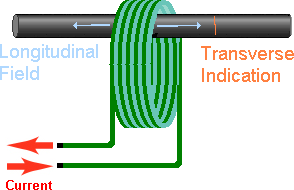
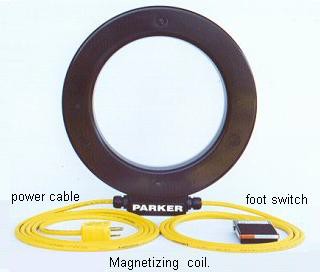
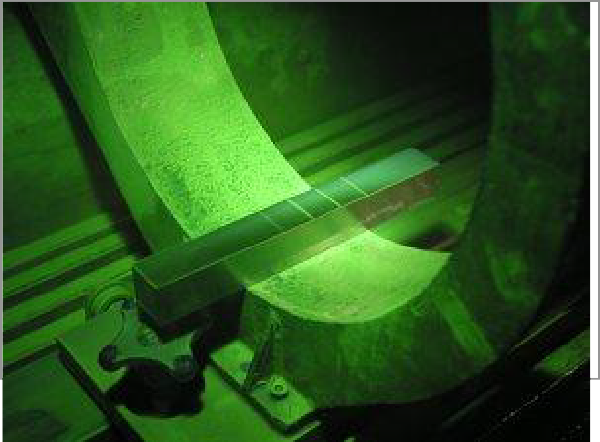
Components in which length predominates, can be readily magnetized in the longitudinal direction by an encircling coil.
For this technique, the magnetic field is produced in the part by wrapping cable around it or placing it within a multi turn fixed coil. Passing current through a coil encircling a section of the test part or encircling the part produces a magnetic field parallel to the axis of the coil. Strongest indications are produced when the length of the discontinuities are at right angles to the axis of the coil. The magnetic field strength of a coil is maximum near the inside wall and zero at the center of the coil.
Portable magnetizing coils are available that can be plugged directly into a standard electrical outlet. This coils are suitable for bar shaped parts.
For a bar shaped part, the effective overall distance that can be inspected is 6 to 9 inches on either side of the coil opening. In testing longer parts, either the part must be moved at regular intervals through the coil or the coil must be moved along the length of the part.
When the cross sectional area of the coil is 10 or more times the cross sectional area of the test part, the required magnetizing current, for object positioned near the inside wall of the coil is,
I = 45000 D / N L
For parts positioned at the center of the coil [ larger parts ], I = 43000 R / N {( 6 L / D ) – 5 }
If the cross sectional area of the coil is less than twice the cross sectional area [ including hollow portions ] of the test part,
I = 35000 / N {( L / D ) + 2 }
Where : L = length of the test part
D = diameter of the test part
N = number of turns in the coil R = radius of the coil
These equations hold only if the L / D ratio is between 3 and 15.
The ease with which a part can be longitudinally magnetized in a coil is significantly related to the length to diameter [ L / D ] ratio of the part. This is due to the demagnetizing effect of the magnetic poles setup at the ends of the part. This demagnetizing effect is very significant for L / D ratios of 3 or less. In such cases, pole pieces of similar cross-sectional area can be attached to both the ends to increase the length of the part and thus improve the L / D ratio.
Artificial discontinuity standards [ such as QQI ] shall be used to ensure proper current levels along the entire axis of the test length.
For complex shapes, alternating current is recommended. When testing tubes in conjunction with alternating current, only the outside surface is magnetized. When testing flange-type parts, the magnetic field lines at the plane surfaces enter the material at right
angles so that the sensitivity to circular cracks on the flange sides is reduced.
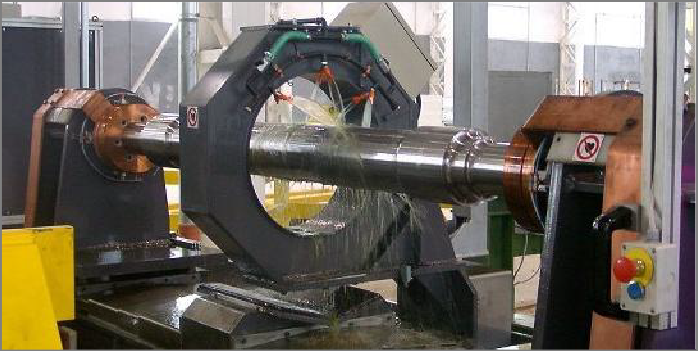
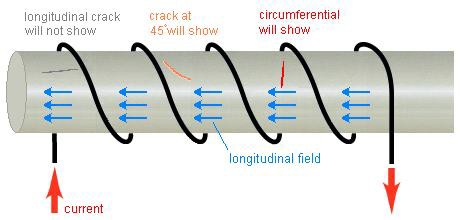
Longitudinal magnetization by Yokes :
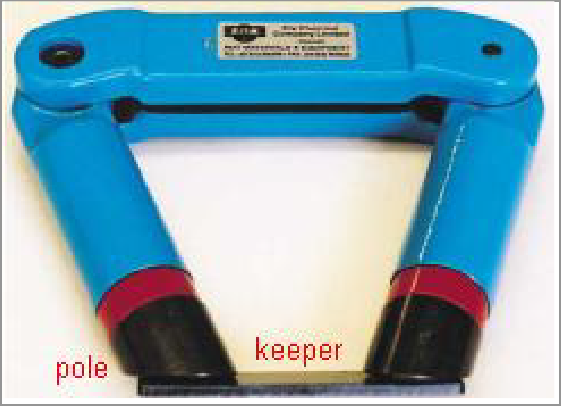
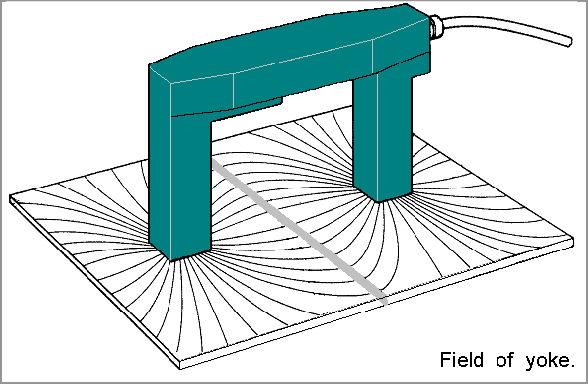
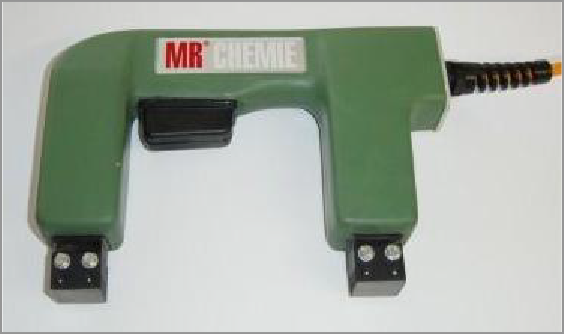
There are two basic types of yokes commonly used for magnetizing purposes. Permanent magnet and Electromagnetic yokes. Both are hand held, compact, light weight and quite mobile. They are used to produce longitudinal magnetization in the test part.
Permanent Magnet Yoke :
Permanent magnet is a body which possesses a large amount of magnetic field and exhibits the property of magnetism at all times with little or no loss of strength.
Permanent magnet yokes usually consists of two individual strong permanent magnets made of highly retentive material such as neodymium iron boron. The two magnets are suitably arranged in hinged arms so that the magnetizing poles at ends are of opposite polarity. The strength of the magnetizing field produced by the permanent magnet yoke is dependent on the initial magnetic charge, magnetic retention properties of the magnets and the distance between the two magnetizing poles. The strength of the field that can be induced in the part is relatively low.
The yoke and the test part surface form a closed magnetic circuit. The magnetic flux flow in the test part in a direct connection line between the poles thus enabling detection of discontinuities whose linear directions are oriented perpendicular to this line.
Permanent magnets are used for examinations where a source of electric power is not available or in inflammable and explosive areas where electrical arcing is not permissible. Apart from this, permanent magnets have little to offer as a magnetizing method.
Permanent magnets can be used as single poles for generating radial field or as pairs to generate a longitudinal field. Inspection area is generally limited to the central region between the poles. The flux is stronger nearer the poles than in the center of the gap.
Examination for indications near the points of contact is not possible due to the confusing mass of particles that gather at the poles.
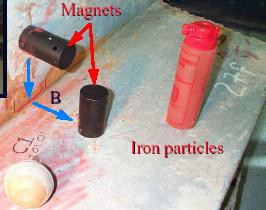
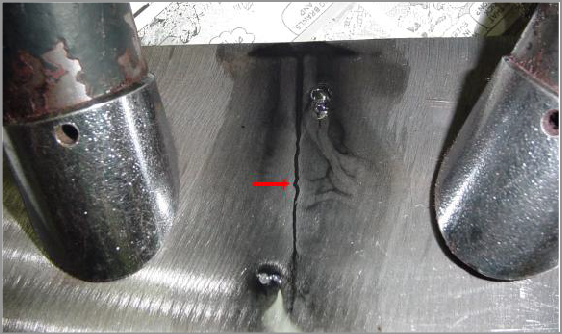
Permanent magnets generate static field and wet particles should be used because dry particles require changing or alternating field to impart mobility.
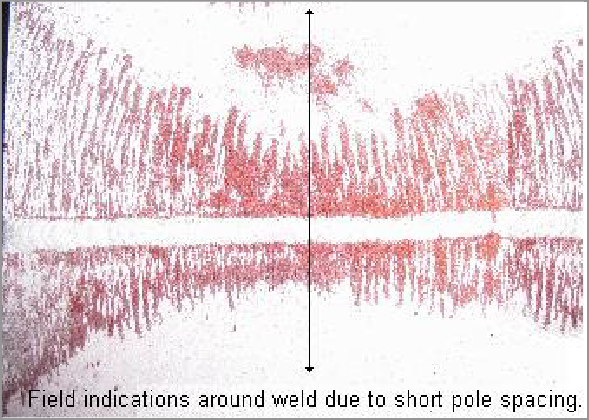
When using permanent magnets, the pole pieces need to be in good contact with the test surface and flexible pole pieces are often used to achieve this. Pole spacing should not be less than 3 inches and more than 6 inches.
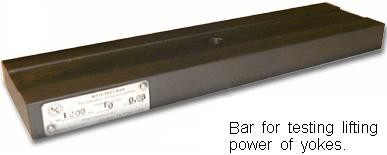
The magnetizing force of a permanent magnet yoke shall be tested daily prior to use by determining its lifting power on a steel plate at maximum pole spacing at which it is being used for the examination. The yoke must be able to lift at least 18.1 kg at the examination pole spacing.
Limitations to use of permanent magnets include the following :
Large areas or masses cannot be magnetized with enough strength to produce satisfactory crack indications.
The inability to vary the field strength at will.
Removal of the magnet from the part is difficult if the magnet is very strong.
Particles may cling to the magnets, possibly obscuring indications and it is difficult to remove the clinged particles from the legs.
Electromagnetic Yoke :
Electromagnets are types of temporary magnets used to produce a temporary magnetic field. They have little or no ability to retain magnetism so that they return to an unmagnetized state when the supply current is switched off.
Electromagnetic Yokes for magnetic particle examination consist of an U shaped soft iron laminated core with flat ends, in which a coil system generates the magnetic flux when current is flowing.
Yokes normally have articulated legs which can be moved to accommodate various shapes of test part and ensure good magnetic contact.
The magnetic flux pass through the soft iron core producing magnetic poles at each end of the core and complete their travel path through the air between these poles. Alternating current yokes provide effective means of part magnetization for detection of surface discontinuities. Half wave rectified current yokes are capable of disclosing surface and sub surface discontinuities.
Prod Contacts :
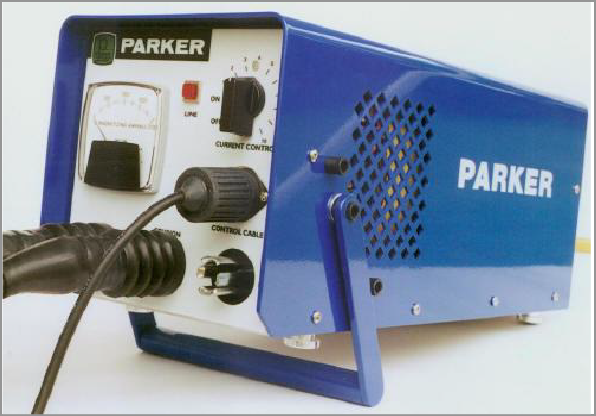
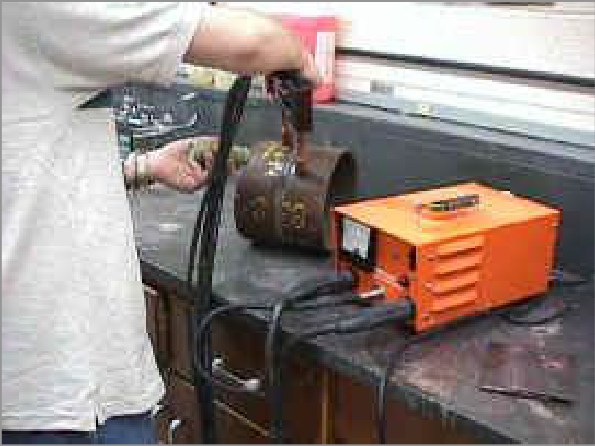
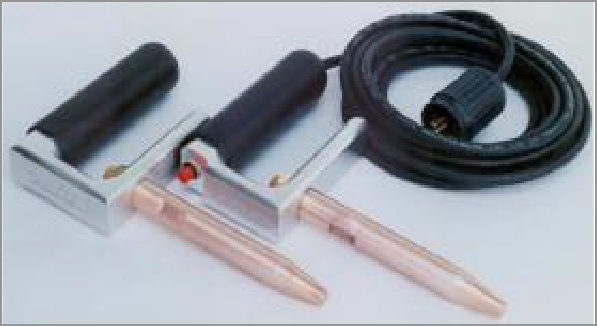
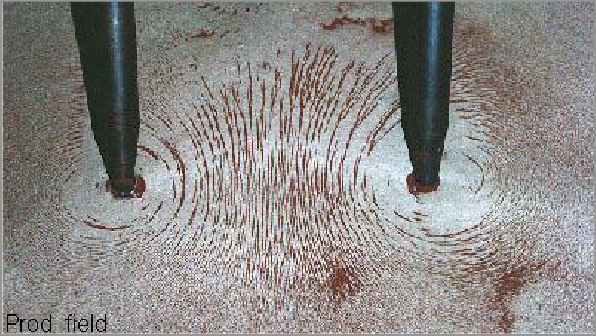
For inspection of large parts, which cannot be tested in a stationary machine and for outdoor examination, magnetization is often done by prod contacts to pass the current directly through the part or through a local portion of it.
Prod units consist of two hand held electrodes, separate or mounted in a frame and connected to a source of low voltage, high amperage current transformer. When the two electrodes are in contact with the surface of the material and they are energized the current passes through the material to complete the circuit and creates a local distorted circular magnetic field in the material.
Prods are used in testing weldments on bridges, railroads, pipeline, pressure vessels, tubing, bar stock, forgings, castings, aircraft, ships for detection of cracks.
This method requires that all mill scale, rust, paint be removed in areas where the prod tips must make electrical contact.
When using prods, the tips must be placed on the examination surface while the current is ‘ off ‘ and with a spacing between
3 to 8 inches. 6 inches spacing is generally recommended. Prod spacing, equal to that of the length of the prod is ideal.
Field strength depends on current, distance between the prods and the section thickness of the part.
The magnetizing current is selected as follows.
Direct or rectified current used, shall be 90 – 110 amperes per inch of prod spacing for sections below 3/4 inch thick and
100 – 125 amperes per inch of prod spacing for section thickness above 3/4 inch. Suitable magnetic fields exist only between and near the prod contact points. The width of the examination zone is 1/4 of prod spacing.
In order to detect longitudinal and transverse defects in an area or a weld seam, the section must be magnetized in two separate directions at right angles to each other. For longitudinal defects in welds, the prods must be placed adjacent to and on opposite sides of the weld bead on each side of the weld seam so that the current direction to the seam makes an angle of about 20° – 30°. When moving to the next area to be examined the applied magnetic field must overlap the previous examined area by at least 10% so that 100% coverage is assured.
In prod contact method of examination, the flow of current directly from the prod tips to the test material can cause arcing on the examination surface. Prolonged energizing cycles cause undesirable overheating below the contact points.
Great care must be taken to avoid burning of the part under the contact points. Burning may be caused by dirty contacts, insufficient contact pressure, or excessive currents. Precautions shall be taken to ensure that the electrical current is not flowing while the prod contacts are applied or removed. Prod tips must be kept clean and dressed to smooth round. If the open circuit voltage of the current source is greater than 25 V, lead, steel, or aluminum tipped prods are recommended to avoid copper deposit on the test surface.
Sensitivity to defects lying wholly below the surface is greater with this method of magnetization than with any other, especially when half wave rectified current is used in conjunction with dry powder and the continuous method of magnetization.
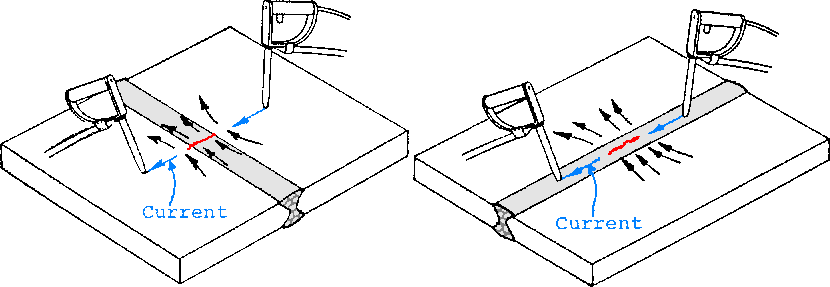 The arcing problem, surface preparation for electrical contact, high electrical consumption, heavy weight of the power unit and weight of long prod cables are the disadvantages of this method.
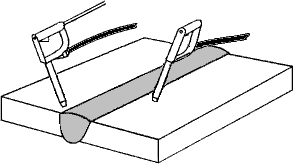
Prod placement for ground and un-ground weld.
Electromagnetic Yoke contd :
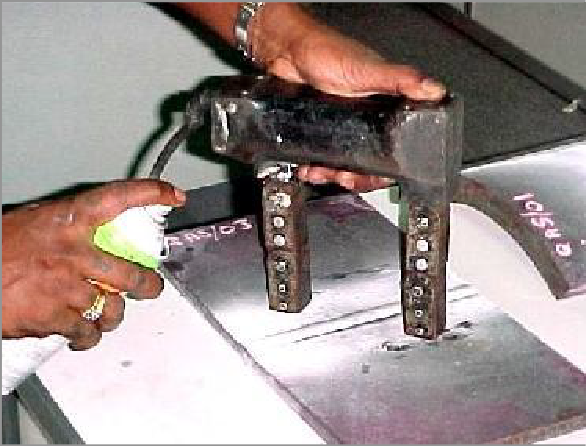

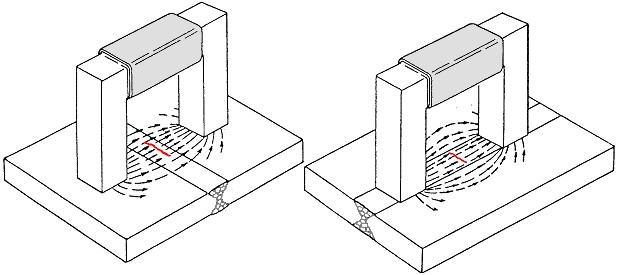

When the poles are placed in contact with the test surface and the yoke is energized, the magnetic flux pass through the surface and near surface region of the material in a direct connection line between the poles to complete a local longitudinal magnetic field. Strongest indications are produced with the yoke technique by discontinuities whose length are at right angles or nearly right angles to an imaginary line connecting the two yoke poles.
The strength of the magnetizing field produced by an electromagnetic yoke is dependent on the magnetic properties of the core, number of ampere – turns, and the distance between the yoke poles.
In yoke technique, magnetic flux pass from the yoke to the test part through surface contact between the flat ends of the yoke poles and the examination surface. If contact is partial, the flux lines entering the test part are weakened by the high reluctance of the air gap and may be too weak to indicate smaller discontinuities.
In use, the magnetizing force of a yoke shall be tested by determining its lifting power on a steel plate at maximum pole spacing at which it is being used for the examination. The minimum weight which a yoke must be able to lift at the examination pole spacing is,
4.5 Kgs for AC yoke.
18.1 Kgs for DC yoke.
If a tangetial field meter is used to measure the field strength, the sensor should be positioned midway between the poles and the reading should be between 30 to 60 gauss.
Magnetic flux pass through both magnetic and non magnetic material. Mill scale or thin paint coating [ .001” magnetic and
.003” non magnetic ] permits examinations by yoke method.
During examination, the yoke is to be positioned on the test part with current ‘ off ‘ condition and with full pole faces to test surface contact. When adjustable yoke is used, the examination pole spacing should be between 3 to 8 inches. A pole spacing of 6 inches is generally recommended. In general, discontinuities to be detected should be centrally located in the area between the pole pieces and oriented perpendicular to an imaginary line connecting them.
The magnetizing field must be applied twice for a complete examination of an area. The fields shall be applied approximately perpendicular to each other. For welds, to detect longitudinal and transverse defects, the magnetic field should be once along the direction of the weld and again across the weld. The weld surface must be ground sufficiently smooth for good contact when the yoke poles are placed in – line on top of the weld material. For as welded surface condition the poles are placed along the same side of the weld and as close as possible to the weld edges.
With yoke magnetization, burning of the test part is avoided because only the magnetic field is transmitted into it, no current enters the test part.
Head shot Method :
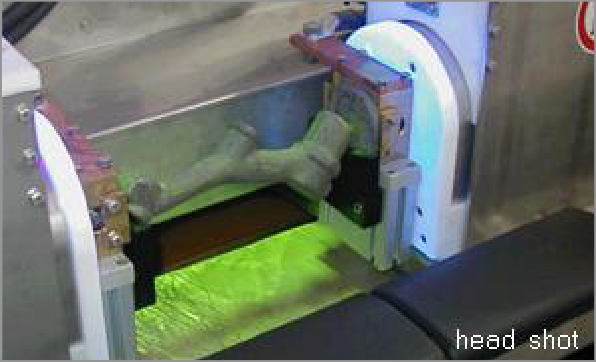
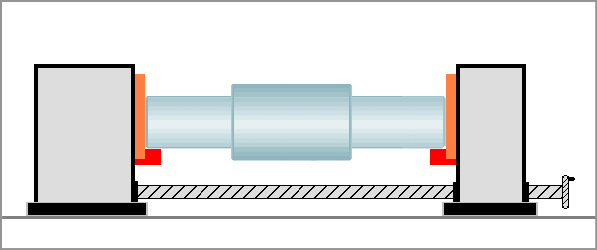
The part is fixed between the heads ensuring good electrical contact and the current is passed from end to end. A circular field is developed in and around the part and the discontinuities oriented along the length are indicated.
If the part contains more than one diameter, then the part is to be tested separately for each diameter. The current applicable for each diameter is applied and the corresponding section is tested. The applicable currents are used in ascending order.
Central Conductor :
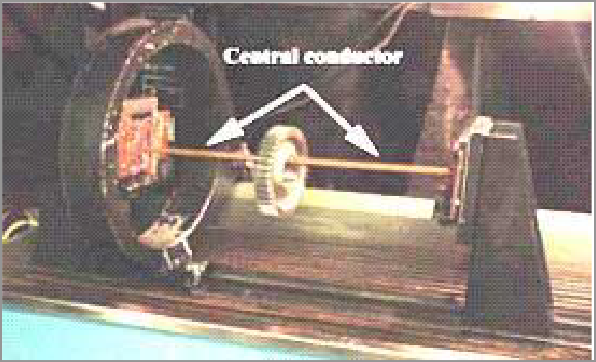
When current is passed through a hollow cylindrical conductor, the magnetic field on the inner surface is zero. A component with a continuous hole through it can be magnetized without contact by means of a current carrying straight conductor passing through the hole. The examination technique is often used in examination of parts such as pipe connectors, hollow cylinders, gear wheels, springs and large nuts.
For this technique, a central conductor is used to magnetize the inner surface of the bore with a circumferential magnetic field.
Defect on the outer surface of a tubular can also be detected if the wall thickness is not too large but there may be a large difference in the magnetic field strength on the two surfaces.
When the axis of the central conductor is located near the central axis of the test object, 12 to 31 amps current per mm of test object diameter should be applied. The diameter to be used for current computation is the largest distance between two points, 180 degrees apart on the inside circumference.
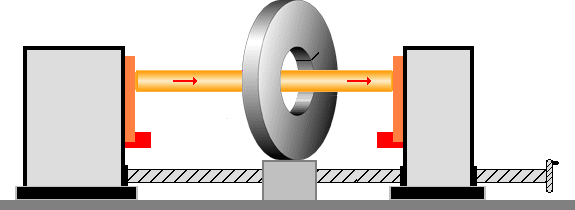
Alternating current is to be used only for surface discontinuities on the inside surface of the test object. Where large diameter cylindrical parts are to be examined, the conductor shall be positioned close to the internal surface of the bore and the circumference of the part shall be examined in increments. A
current of 12 to 31 amps per mm shall apply except that the diameter shall be considered the sum of the diameter of the conductor and twice the wall thickness of the part. The distance along the test object circumference [ ID / OD ] which is effectively magnetized is to be taken 4 times the diameter of the conductor. The parts are the inspected in four quadrants or segments. This provides a greater induced field for a lesser current value.
Bars or cables, passing through the bore of a cylindrical part, may be used to induce circular magnetization.
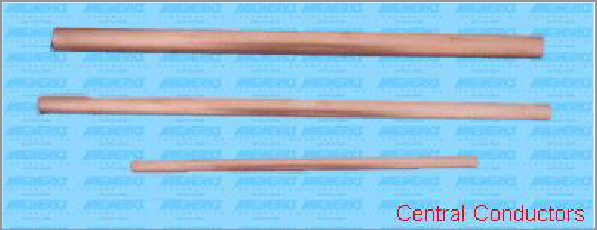
Bars are usually made of copper to reduce heating. If a flexible cable is used, several turns of cable may be passed through the bore and the current reduced in proportion to the number of turns. The magnetic field will increase in proportion to the number of times the central conductor cable pass through the bore.
The magnetic field adequacy shall be verified using a field indicator.
The strength of the magnetic field around a magnetic or non magnetic conductor decreases as the distance from the surface of the conductor increases. The amount of decreases is dependent on the conductor material, cross section and type of current.
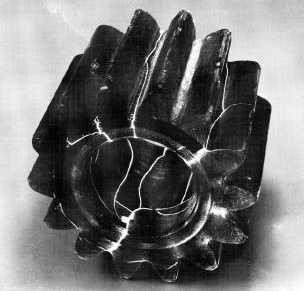
Indications produced by central conductor.
Magnetic Particles :

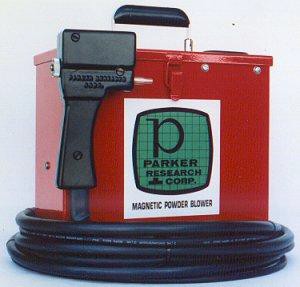

Powder blower
Magnetic particles are finely divided ferromagnetic [ Iron ] material. They must have,
High Permeability, easily attracted to weak leakage fields. Low retentivity, not attract each other outside magnetic field. Non Toxic, relatively harmless to the user.
Fine particles are sensitive for surface breaking defects. Coarse particles are superior for sub surface defects. Particles do not act as single unit but clump together to form the indications when magnetized. The particle size should be smaller than the width of opening for detecting surface breaking cracks.
The two basic types of magnetic particles are,
Dry Particles, fine or coarse, applied as dry powder.
Wet particles, fine particles applied as suspended in a liquid.
Dry Particles : Dry particles are coarse and larger than wet particles. The particles have a range of sizes and shapes and are available in many colors such as yellow, gray, black, brown, red.
Fluorescent dry particles are also available, but are not in general use mainly because of economic considerations. The color of the particles used for testing is determined by the color of the surface being examined and is selected for maximum contrast.
Dry particles are superior for detecting flaws lying wholly below the surface because of its higher permeability and irregular shapes.
Large heavy particles are not likely to be arrested and held by a weak leakage field when they are moving on the part surface.
Very fine dry particles behave like dust and easily adhere to any damp or slightly oily surface to produce heavy dusty background. Finer particles add mobility and sensitivity for fine surface cracks while larger particles add sensitivity for detection of sub surface defects and counteract the tendency of the finer ones to leave a dusty back ground. Dry particles which are a mixture of coarse and fine particles are mostly preferred.
Dry powder are primarily used on rough surfaces, such as un- ground welds and castings, threaded parts and for detection of defects below the surface. It does not have the tendency to drift into the roughness of the surface as a wet suspension does. Dry particles with half wave direct current and prods is the best approach when inspecting lack of penetration in thinner welds and hot tears and cracks in castings.
When used outdoors, breezes can cause the dry powders to blow around. Dry particles are not affected by cold and can be used at low temperatures. They are also heat resistant, and many powders are usable at temperatures up to 6000 F.
Reclamation and reuse of dry particles is not recommended. Application : Air is used to carry the particles to the examination surface. Dry powder should be applied such that the particles approach the examination surface in a uniform cloud with minimum of motion. In this way the particles reach the leakage field while suspended in air and have three dimensional mobility. This condition can be best achieved when the magnetized surface is vertical or overhead. When particles are applied to a horizontal or sloping surface, they settle directly to the surface and do not have the same degree of mobility. Half wave rectified direct current is recommended with dry particle inspection to impart the required mobility. The magnetizing current must be initiated before the application of the particles to the test surface and shall be terminated after the excess particles have been blown off.
For Dry particle examination, the test surface must be dry, free from grease and other adhering deposits. The particles themselves must be free from moisture.
The relative merits of dry particles depend on the skill in application. Dry powder can be applied by small rubber spray bulb, squeeze bottles or specially designed powder blowers. The air stream of these blowers is of low velocity so that a cloud of powder is applied to the test area. These blowers can also deliver a light stream of air for gentle removal of excess powder from the examination surface. Excess dry particles around an indication, can be removed by a regulated air supply, air bulb or gentle blowing while the magnetizing field is present. The air stream should be of sufficient force to remove the excess particles without disturbing those particles that are evidence of indications.
Precautions shall be taken to prevent inhaling of dry particles.
Magnetic Particles :
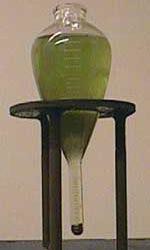

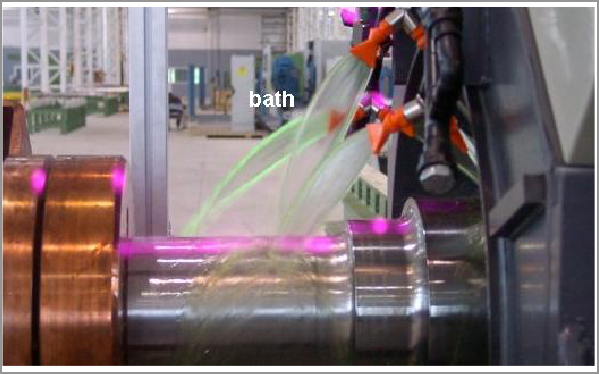

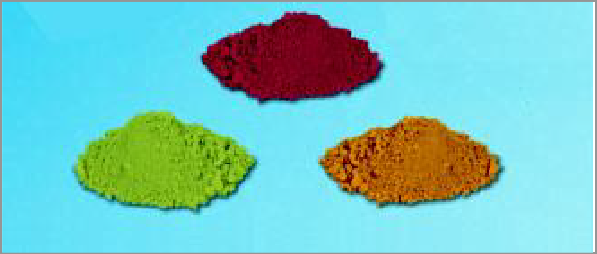
Wet particles are finer in size [ avg 6 and up to 25 microns ] and are sensitive for detection of surface flaws such as fatigue cracks and other close to surface defects. The particles are applied with a liquid carrier. Particle sizes more than 20 microns settle out of suspension rather rapidly and are left behind as the suspension liquid drains off. Stranded particles often line up and produce false indications. In the case of finer particles, the stranding due to draining away of the liquid occurs much later, giving the particles mobility long enough to reach the leakage fields and accumulate to form the indications.
Wet particles are commonly used in stationery horizontal units where a recycled bath can be used until contaminated and discarded. They are also used in field operations with portable magnetizing equipments. Care must be taken to agitate the bath constantly to keep the particles suspended.
The particles are available in colors such as black, brown, dark red, green etc. Black particles are more sensitive. Fluorescent particles are also available where the particles are bonded to a fluorescent chemical which fluoresce brilliant yellow – green or orange – red under ultraviolet illumination. These particles have excellent visibility when illuminated by Ultraviolet light.
The particles are supplied in the form of a paste, concentrates or powders, that is to be suspended in liquids to produce the coating bath. The liquid is usually a light oil, such as kerosene, or it can be water. Water uses conditioners such as wetting agent and corrosion inhibitors. These conditioners are usually incorporated in the pastes and concentrates. Proper wetting of the test surface shall be determined by a water break test.
The bath shall be applied either by gently spraying or flowing the suspension over the area to be tested. It is important to apply the suspension liberally and to allow it to flow slowly across the area of examination so that the particles can migrate to the leakage fields freely. The application of suspension must stop before the magnetizing current is switched off, otherwise the indications may be washed away. Weakly held indications on highly finished parts are readily washed away and care must be taken to prevent high velocity of the bath flow over critical areas.
Some technical experience is needed in applying the suspension properly, but more errors are made by not using correct particle concentration and state of cleanliness in the suspension.
Settling Test : Mixing wet particles should be as specified in the test procedure or as recommended by the manufacturer. The particle concentration for newly made mixture can be checked in the pear shaped ASTM centrifuge tube. 100 ml of fully agitated suspension is poured into the centrifuge tube and allowed to settle for 30 minutes under undisturbed condition. The amount of powder settled can then be read on the graduated cylindrical part of the tube. The recommended settling volume is from 1.2 to 2.4 ml per 100 ml liquid for non fluorescent and from 0.1 to 0.5 ml in a 100 ml bath sample for fluorescent particles, unless otherwise specified by the manufacturer. For re – circulated suspension, dirt in the bath will also settle and usually shows as a separate layer on top of the particles. If a fluorescent bath is under test, the liquid above the precipitate may fluoresce because of oily contamination or release of the fluorescent coating, and the bath must be discarded.
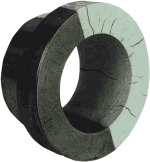
For re – circulating type test system, the use of centrifuge settling test for checking the concentration after a number of testing cycles is not reliable because of the contamination of the bath by rust, fine scale, dust particles etc left out by test part, will cause false volume reading. An MTU 3 [ magnetized ring with residual field ] can be used to check the efficiency of the used suspension.
White Contrast Paint : For non fluorescent particles, an easily removable and quick drying white paint [ .001” to .003” thickness max ] should be applied to the test surface so that a high contrast is obtained between the indications and the background. Contrast paint is best applied by spraying, as this results in a thin, even layer.
Fluorescent particles provide the highest contrast and visibility and do not require contrast medium.
Demagnetization :
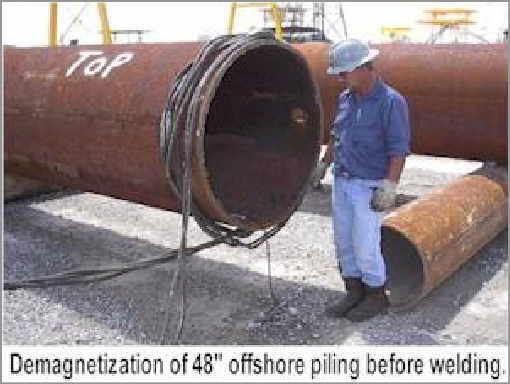
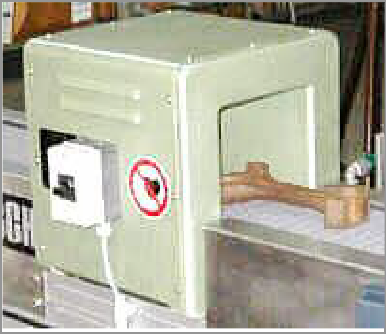
After the magnetic particle test, there may be some residual magnetism remaining in the part. The amount of this residual magnetism depends upon the retentivity and the level of the applied magnetizing field strength for the purpose of examination. It is necessary to demagnetize the component if residual magnetism is detected. Residual magnetic field can:
- Affect machining by causing cuttings to cling to the surface.
- Interfare with nearby magnetic and electric equipments such as a magnetic compass.
- Can create a condition known as ‘arc blow’ in the welding process. Arc blow may cause the weld arc to wander or filler metal to be repelled from the weld. This condition is especially a problem when an automatic welding machine is used.
- Magnetism in engine and rotating parts can attract metal particles into bearings and increase wear.
Removal of residual field may be accomplished in many ways. When steel is heated above its curie temperature, it will become austenitic [ non magnetic state ] and loose its magnetic properties. The curie temperature for a low carbon steel is 7700 C.
It is often inconvenient to heat a material above its curie temperature to demagnetize, so other methods that returns the material to a nearly demagnetized state is commonly used.
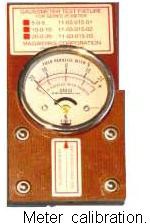
Residual Field Meter.
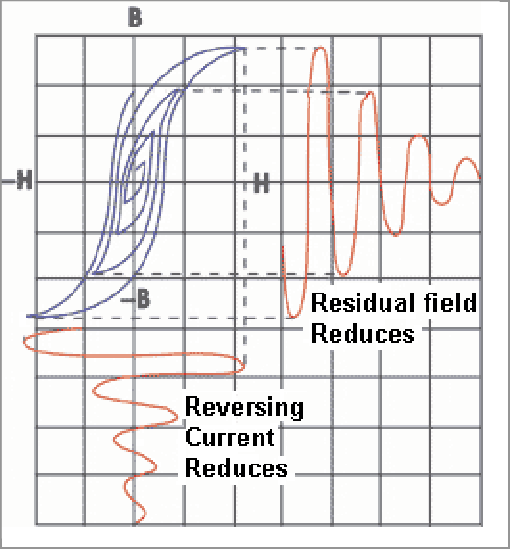
Subjecting the component to a reversing and decreasing continuous magnetic field, will effectively demagnetize the part.
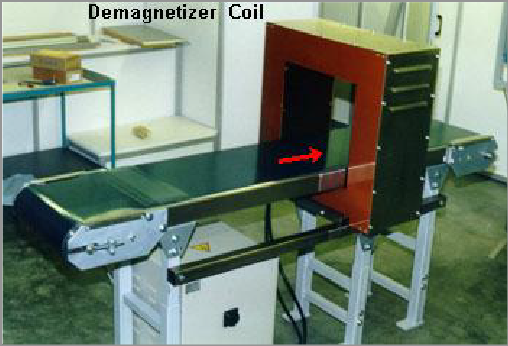
The most common method of demagnetization uses an energized AC coil through which the part is passed. On large parts, the coil is moved away from the part while the power is still on or the part remains in the coil while the current is gradually reduced to zero. The reducing current can be passed directly through the part on relatively large parts.
DC that is reversed in polarity by special switching devices and by diminishing the applied current in each reversal, demagnetization can be achieved more thoroughly. This multiple step down reversing and decreasing DC demagnetizer works similarly to the AC step down system. Because of the difficulty in reverse switching of DC, the equipment is much more complicated than for AC and therefore, more expensive. A commonly used frequency is one reversal per second. The reversing DC provides deeper penetration than does AC and thus has advantage in application on thicker parts that are difficult to demagnetize. The reversing
DC may use a coil or the current can be passed directly through the part.
It is desirable to start demagnetization using a stronger field than that was used to magnetize the part during the examination.
Yokes can be used in the AC mode to reduce the magnetism from surface of large components. More than one yokes can be used together to strengthen the demagnetizing field.
Magnetic particle Inspection with AC has the advantage of not leaving a strong residual field in the part so that, in a sense, it is self demagnetizing. Many stationary horizontal inspection units provides demagnetization feature that slowly reduce the alternating field in a coil in which the component is placed.
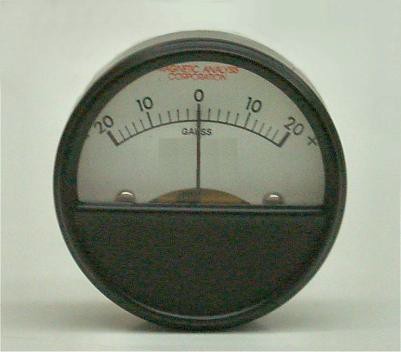
A calibrated field meter, known as Gaussmeter, is often used to verify that the residual field has been removed from the component. When using, it is only necessary to touch the lower edge of the meter to the part and read the pointer position on the dial. These center zero meters are available in many ranges, +/- 10 gauss range is the one most often used for machine shop and tool room work. Since magnetic leakage fields are strongest at an edge or corner of a part, this is the best place to measure the residual field. Industry standards usually require that the residual magnetic field be reduced to less than 3 gauss after completing the inspection. 10 gauss field is less likely to cause problem in welding.
Demagnetization techniques :
50 cycle AC coil — small parts up to 2 inch dia.
50 cycle AC, current flow — relatively large size and retentive parts. Reversing DC coil — suitable for small parts.
Reversing DC, current flow — best for large parts. Wrapping cable, full length — long parts. [ pipes, bars etc. ]
AC yoke — small parts, local near surface area of large parts. Prod, reversing DC — local area of large parts by reversing prod position, and reducing current in each step by 20 to 40 amps.
Field Indicators :
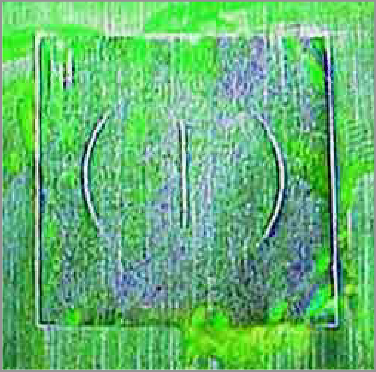
The applied magnetizing field shall have sufficient strength to produce satisfactory discontinuity indications.
A reference standard may be used for procedure development and system check. The standard may be an actual test object with known When it is necessary to verify the adequacy of magnetizing field strength, it can be verified by using one or more of the following three methods.
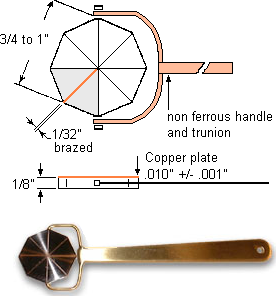
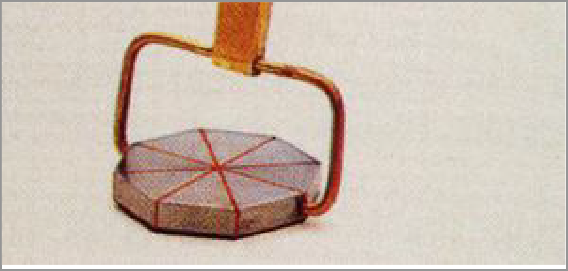
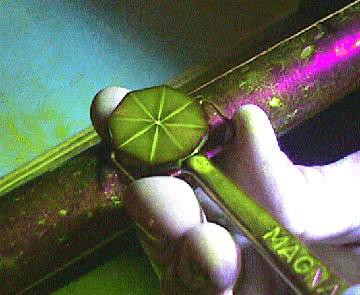
Pie – shaped field indicator : These are artificial flaws used as a convenient rough check of the adequacy and direction of part magnetization; It is not, however intended as a quantitative indicator of field strength or distribution.
These indicators are made from low retentivity carbon steel pie sections that are brazed together to form a series of crossing artificial flaws lines as shown.
In use, the field indicator is positioned on the surface to be examined, such that the copper plated side is opposite to the examination surface.
A suitable field strength is indicated when a clearly defined line or lines of magnetic particles form across the copper face of the
indicator when the magnetic particles are applied simultaneously with the magnetizing force.
When a clearly defined line of particles is not formed, or not formed in the desired direction, the magnetizing technique should be changed or adjusted.
These indicators are best used with dry particle procedures.
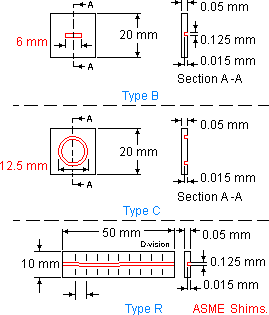
Artificial flaw shims / QQI : The shim shall be securely attached to the surface to be examined, such that the artificial flaw side of the shim is towards the examination surface.
A suitable field strength is indicated when a clearly defined line
( or lines ) of magnetic particles form (s) across the shim face of the indicator when the magnetic particles are applied simultaneously with the magnetizing force.
When a clearly defined line of particles is not formed, or not formed in the desired direction, the magnetizing technique should be changed or adjusted.
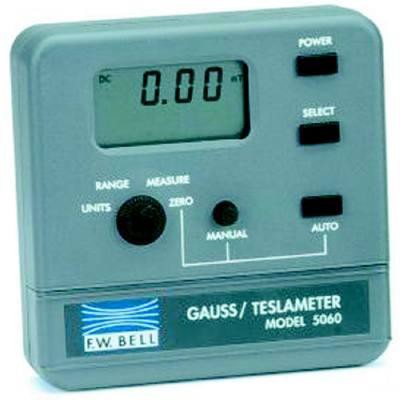
Shim – type indicators are best used with wet particle procedures. Tangential field strength Gaussmeters : Hall effect tangential field probe should be used for measuring the peak value of a tangential
field. A suitable field strength is indicated when the measured field is within the range of 30 to 60 Gauss [ 2400 to 4800 Amp / meter ] while the magnetizing field is applied. These meters are not suitable for measuring field strength for encircling coil magnetization methods.
The active area of the hall effect probe should not be larger than 5 by 5 mm and the center of the detector should be within 5 mm from the test part surface. The plane of the probe must be approximately perpendicular to the surface of the test part at the location of measurement.
The meter must be calibrated at least once a year or whenever it has been subjected to a major repair, periodic overhaul or damage.
Interpretation of indications :
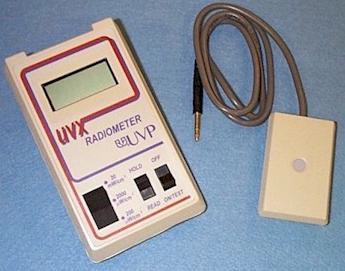
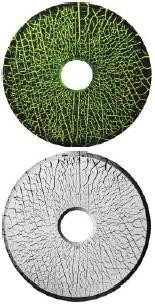
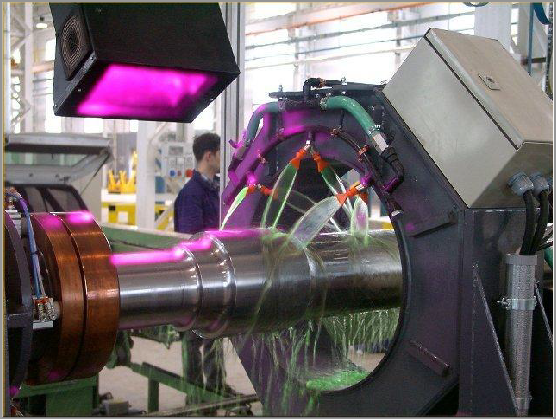
UV light meter.
Black ink
Fluorescent
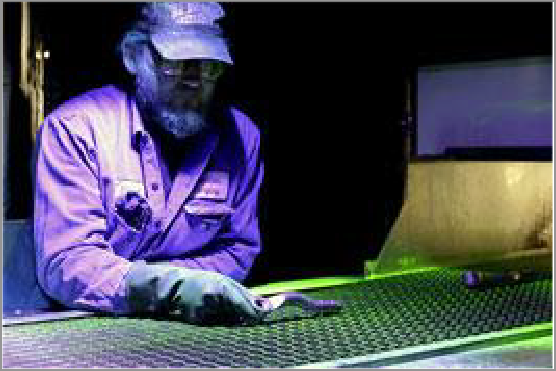
Examination under UV light
Discontinuities on or near the surface are indicated by retention of the particle patterns. Localized surface irregularities due to machining marks, grinding marks, weld ripples or other surface conditions may produce non relevant or false indications. Broad areas of particle accumulation, which might mask indications from discontinuities, are prohibited, and such areas shall be cleaned and re-examined.
Measuring light intensity : For color contrast particles, the examination must be performed under adequate visible light and the intensity shall be at least 500 Lux on the examination surface when measured with a suitable calibrated Lux meter.
Fluorescent indications shall be viewed in a darkened area using ultraviolet light, called black light. The black light shall be allowed to warm up for a minimum of 5 minutes before the light intensity is measured with a calibrated black light meter. A minimum of 1000 W / cm2 illumination is required on the examination surface. The distance of measurement between the lamp and the detector shall be minimum
6 inches. The background white light illumination shall not exceed
20 Lux.
Dark adaptation : When using florescent materials, the examiner shall be in the darkened area for at least 5 minutes to enable his eyes to adapt to dark viewing. The examiners shall not wear photo sensitive lenses during examination.
Interpretation of indications 2 :
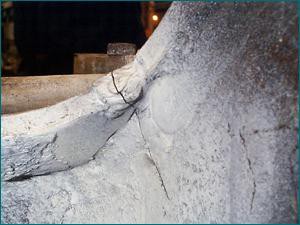
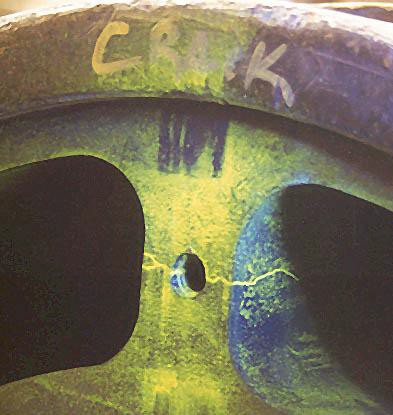
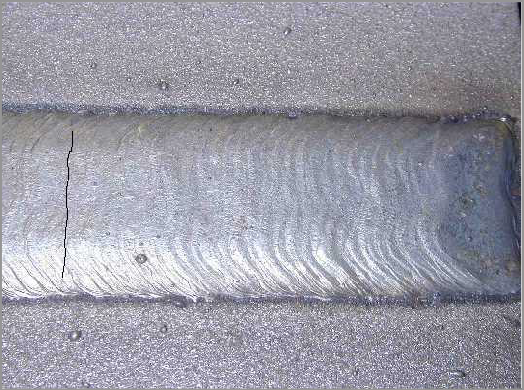
Evaluation : The evaluation for indications shall be performed with the current ‘ off ‘ condition, unless the patterns of the indications do not change due to overhead or vertical position of the examination surface.
All indications shall be evaluated according to the acceptance criteria specified in the written procedure.
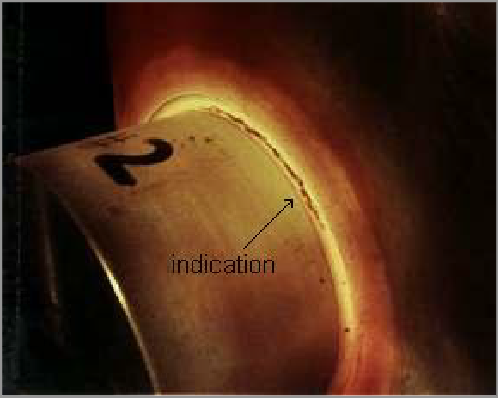
The shape, sharpness of outline, width and the height of particle buildup are the principle features by which discontinuities can be identified and distinguished from one another.
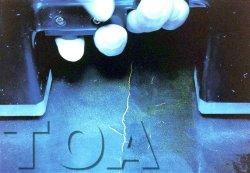
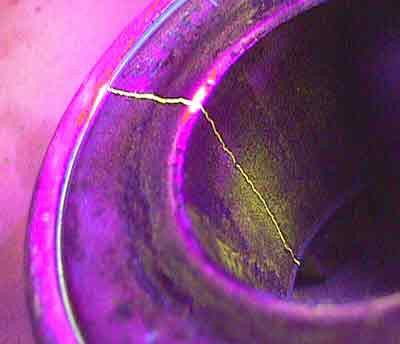
Surface discontinuities produce indications that are sharp and well defined. Sub surface discontinuities produce indications that are broad and fuzzy. The deeper the discontinuity the lesser the definition of the indication.
When unusual indications are produced, it may be necessary to establish identity by correlating the results with other examination methods.
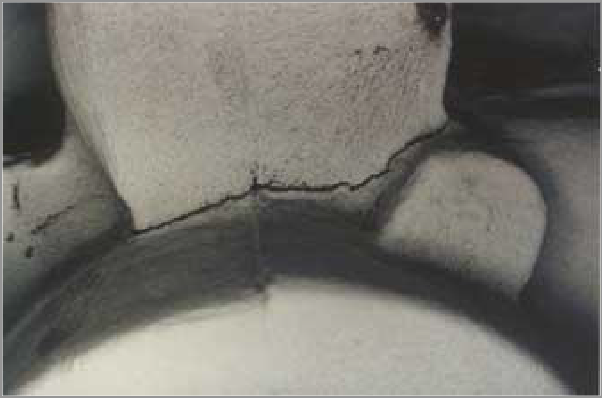
Surface cracks : powder indications are elongated, sharply defined, tightly held and usually built up heavily with powder.
Seams : are closed tight, shallow longitudinal cracks, produce lighter indications.
Sub surface cracks : indications are elongated, the deeper the crack the wider and fuzzier the built up of the indication
Crater Cracks : These are recognized by their patterns which are small and occur at the terminal point of the weld. They may be a single line in almost any direction multiple or star shaped.
Undercut : An indication produced at weld edges, adheres less strongly than the indications obtained by lack of fusion. Undercut can be detected by visual examination
Incomplete fusion near the surface : Accumulation of powder will generally be pronounced and the edge of the weld will be seen.
The nearer the discontinuity is to the surface the sharper the pattern will be.
Inclusion and Pore at surface : Forms light elongated or round indication.
False indications : are the indications in which the particles are held by gravity or surface roughness. No magnetic or leakage field is involved in formation of these indications. Magnetic particles can settle in shallow grooves, scratches, and give the appearance of a crack.
Non Relevant indications : these are true indications produced by leakage fields. However, the conditions causing them are present by design or accident or other features and have no relation to a discontinuity that is considered to be a defect.
If the magnetization is too high, magnetic particle build up can occur at edges or notches. If a magnetized specimen surface is rubbed with a sharp corner of another magnetized material, a track can be formed which attracts magnetic particles. The indications are fuzzy or intermittent and broad caused by loosely held particles and will not appear after demagnetization. This is known as magnetic writing and is usually the result of accidental abrasion.
Non relevant indications can be caused by, excessive magnetizing current, abrupt change in section thickness, flow lines in forgings, corners, permeability or hardness difference, brazed joint in magnetic material, magnetic to non magnetic material weld, drilled holes, keyways, slots near the surface.
Acceptance standard for welds : ASME Sec VIII Appendix –
- relevant indications : indications with major dimensions greater than 1 / 16 in. [ 1.6 mm ].
- linear indications : an indication having a length greater than three
times the width.
- rounded indications : an indication of circular or elliptical shape with
the length equal to or less than three times the width.
An indication in excess of the limits specified below is not acceptable :
- Relevant linear indications;
- Relevant rounded indications greater than 3 / 16 in. [ 4.8 mm ]
- Four or more relevant rounded indications in a line separated by 1 / 16 in. (1.6 mm) or less [ edge – to – edge ].



Responses