General NDT Group
Welcome to [NDT Inspection Portal]’s general NDT discussion group, a place for professionals in... View more
NDT METHODS AND APPLICATIONS
NDT METHODS AND APPLICATIONS
NDT (Non-Destructive Testing): Methods & Applications
Introduction:1.1-What is NDT?
Non-destructive testing (NDT) is the branch of engineering concerned with all methods of detecting and evaluating flaws in materials, i.e. Inspect or measure without doing harm.
Flaws can affect the serviceability of the material or structure, so NDT is important in guaranteeing safe operation as well as in quality control and assessing plant life. The flaws may be cracks or inclusions in welds and castings, or variations in structural properties which can lead to loss of strength or failure in service, especially in industries where component failure could present a significant hazard or cause severe economic loss. Industries that use it have saved millions of dollars per year in cost savings or cost avoidance.
Non-destructive testing is used for in-service inspection and for condition monitoring of operating plant. It is also used for measurement of components and spacings and for the measurement of physical properties such as hardness and internal stress.
The essential feature of NDT is that the test process itself produces no deleterious effects on the material or structure under test.
The subject of NDT has no clearly defined boundaries; it ranges from simple techniques such as visual examination of surfaces, through the well-established methods of radiography, ultrasonic testing, magnetic particle crack detection, to new and much specialised methods such as the measurement of Barkhausen noise and positron annihilation.
NDT methods can be adapted to automated production processes as well as to the inspection of localised problem areas.
What is the difference between NDE and NDT?
1.2-What is NDE?
Nondestructive evaluation (NDE) is a term that is often used interchangeably with NDT.
However, technically, NDE is used to describe measurements that are more quantitative in nature. For example, an NDE method would not only locate a defect, but it would also be used to measure something about that defect such as its size, shape, and orientation.
NDE may be used to determine material properties, such as fracture toughness, formability, and other physical characteristics.
1.3-What are the uses of NDT Methods?Flaw Detection and EvaluationLeak DetectionLocation DeterminationDimensional MeasurementsStructure and Microstructure CharacterizationEstimation of Mechanical and Physical PropertiesStress (Strain) and Dynamic Response MeasurementsMaterial Sorting and Chemical Composition Determination1.4-When are NDT Methods Used?
There are NDT application at almost any stage in the production or life cycle of a component:
To assist in product developmentTo screen or sort incoming materialsTo monitor, improve or control manufacturing processesTo verify proper processing such as heat treatingTo verify proper assemblyTo inspect for in-service damage
In order to give you greater insight into its versatility, here is a list of some of the many industry uses for NDT:
Aerospace – Aircraft suffer many types of structural deterioration including corrosion, fatigue, fabrication defects, operation and maintenance, and unforeseen loading.
It is critical to inspect surfaces for any damage that may exist in order to determine the extent of repair work needed, whether that occurs as a result of manufacturing or while the aircraft is in service.
Following a period of service, aircraft engines are disassembled, cleaned, inspected and then reassembled. Fluorescent penetrant inspection is used to check for cracks and other damage.
Automobiles – The automotive industry relies on NDT during manufacture to test for flaws in brakes, steering and critical engine components.
Bridges – The U.S. has 578,000 highway bridges says the NDT Resource Center. Corrosion, cracking and other damage can all affect bridge load carrying capacity. Therefore, all of the elements that directly affect performance of the bridge including the footing, substructure, deck, and superstructure must be periodically inspected or monitored with NDT.
Pipelines – NDT is used to inspect oil & gas industry pipelines to prevent leaks that could damage the environment.
Power plants – Periodic in-service inspection is carried out during maintenance outages to deliver essential input for assessing the structural integrity of primary circuit components. Among other things, this includes inspection of boiler, feedwater and condenser tubes, turbine components and steam lines.
Pressure vessels – The failure of a pressure vessel can result in the rapid release of a large amount of energy. Tanks are inspected using radiography and ultrasonic testing to protect against such an event.
Railroads – The railroad industry inspect thousands of miles of rails each year to find cracks that could lead to a derailment. NDT also tests locomotive and rolling stock axles for fatigue cracks.
Shipbuilding – Non-destructive testing has become an integral part of the shipbuilding industry and is used to the quality of finished products.
It has the secondary purpose of cutting the expense of faulty working materials and of assisting in the development of new manufacturing processes and materials.
Storage tanks – Robotic crawlers use ultrasound to inspect the walls of large above ground tanks for signs of thinning due to corrosion.
Methods and techniques
NDT is divided into various methods of nondestructive testing, each based on a particular scientific principle. These methods may be further subdivided into various techniques. The various methods and techniques, due to their particular natures, may lend themselves especially well to certain applications and be of little or no value at all in other applications. Therefore, choosing the right method and technique is an important part of the performance of NDT.
Acoustic emission testing (AE or AT)Blue etch anodize (BEA)Dye penetrant inspection or liquid penetrant testing (PT or LPI)Electromagnetic testing (ET) or electromagnetic inspection (commonly known as “EMI”)Alternating current field measurement (ACFM)Alternating current potential drop measurement (ACPD)Barkhausen testingDirect current potential drop measurement (DCPD)Eddy-current testing (ECT)Magnetic flux leakage testing (MFL) for pipelines, tank floors, and wire ropeMagnetic-particle inspection (MT or MPI)MagnetovisionRemote field testing (RFT)EllipsometryEndoscope inspectionGuided wave testing (GWT)Hardness testingImpulse excitation technique (IET)Microwave imagingTerahertz nondestructive evaluation (THz)Infrared and thermal testing (IR)Thermographic inspectionScanning thermal microscopyLaser testingElectronic speckle pattern interferometryHolographic interferometryLow coherence interferometryOptical coherence tomography (OCT)ProfilometryShearographyLeak testing (LT) or Leak detectionHydrostatic testAbsolute pressure leak testing (pressure change)Bubble testingHalogen diode leak testingHydrogen leak testingMass spectrometer leak testingTracer-gas leak testing method for helium, hydrogen and refrigerant gasesMagnetic resonance imaging (MRI) and NMR spectroscopyMetallographic replicasSpectroscopyNear-infrared spectroscopy (NIRS)Mid-infrared spectroscopy (MIR)(Far-infrared =) Terahertz spectroscopyRaman SpectroscopyOptical microscopyPositive material identification (PMI)Radiographic testing (RT) (see also Industrial radiography and Radiography)Computed radiographyDigital radiography (real-time)Neutron imagingSCAR (small controlled area radiography)X-ray computed tomography (CT)Resonant inspectionResonant acoustic method (RAM)Scanning electron microscopySurface temper etch (Nital Etch)Ultrasonic testing (UT)Acoustic resonance technology (ART)Angle beam testingElectromagnetic acoustic transducer (EMAT) (non-contact)Laser ultrasonic (LUT)Internal rotary inspection system (IRIS) ultrasonic for tubesPhased array ultrasonic (PAUT)Thickness measurementTime of flight diffraction ultrasonic (TOFD)Time-of-flight ultrasonic determination of 3D elastic constants (TOF)Vibration analysisVisual inspection (VT)Pipeline video inspectionWeight and load testing of structuresCorroscan/C-scan3D computed tomographyIndustrial CT scanningHeat Exchanger Life Assessment SystemRTJ Flange Special Ultrasonic Testing2.1-Six Most Common NDT MethodsVisualLiquid PenetrantMagneticUltrasonicEddy CurrentX-ray2.1.1-Visual Inspection
Most basic and common inspection method.
Tools include fiberscopes, borescopes, magnifying glasses and mirrors.
Portable video inspection unit with zoom allows inspection of large tanks and vessels, railroad tank cars, sewer lines. Robotic crawlers permit observation in hazardous or tight areas, such as air ducts, reactors, pipelines.
2.1.2-Liquid (Dye) Penetrant Inspection
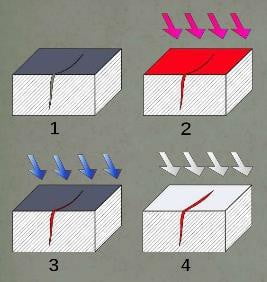
A liquid with high surface wetting characteristics is applied to the surface of the part and allowed time to seep into surface breaking defects.
The excess liquid is removed from the surface of the part.
A developer (powder) is applied to pull the trapped penetrant out the defect and spread it on the surface where it can be seen.
Visual inspection is the final step in the process. The penetrant used is often loaded with a fluorescent dye and the inspection is done under UV light to increase test sensitivity.
 Section of material with a surface-breaking crack that is not visible to the naked eye.Penetrant is applied to the surface.Excess penetrant is removed.Developer is applied, rendering the crack visible.2.1.3-Magnetic Particle Inspection
The part is magnetized. Finely milled iron particles coated with a dye pigment are then applied to the specimen. These particles are attracted to magnetic flux leakage fields and will cluster to form an indication directly over the discontinuity. This indication can be visually detected under proper lighting conditions.
2.1.4-Radiography
The radiation used in radiography testing is a higher energy (shorter wavelength) version of the electromagnetic waves that we see as visible light. The radiation can come from an X-ray generator or a radioactive source.
Film Radiography
The part is placed between the radiation source and a piece of film. The part will stop some of the radiation. Thicker and denser area will stop more of the radiation.
The film darkness (density) will vary with the amount of radiation reaching the film through the test object.
Radiographic Images:
2.1.5-Eddy Current Testing
Eddy current testing is particularly well suited for detecting surface cracks but can also be used to make electrical conductivity and coating thickness measurements. Eddy current inspection is one of several NDT methods that use the principal of electromagnetism as the basis for conducting examinations. Several other methods such as Remote Field Testing (RFT), Flux Leakage and Barkhausen Noise also use this principle.
Eddy currents are created through a process called electromagnetic induction. When alternating current is applied to the conductor, such as copper wire, a magnetic field develops in and around the conductor. This magnetic field expands as the alternating current rises to maximum and collapses as the current is reduced to zero. If another electrical conductor is brought into the close proximity to this changing magnetic field, current will be induced in this second conductor. Eddy currents are induced electrical currents that flow in a circular path. They get their name from “ eddies” that are formed when a liquid or gas flows in a circular path around obstacles when conditions are right.
Variations in the electrical conductivity and magnetic permeability of the test object, and the presence of defects causes a change in eddy current and a corresponding change in phase and amplitude that can be detected by measuring the impedance changes in the coil, which is a telltale sign of the presence of defects.
One of the major advantages of eddy current as an NDT tool is the variety of inspections and measurements that can be performed. In the proper circumstances, eddy currents can be used for:
Crack detectionMaterial thickness measurementsCoating thickness measurementsConductivity measurements for:Material identificationHeat damage detectionCase depth determinationHeat treatment monitoring
Some of the advantages of eddy current inspection include:
Sensitive to small cracks and other defectsDetects surface and near surface defectsInspection gives immediate resultsEquipment is very portableMethod can be used for much more than flaw detectionMinimum part preparation is requiredTest probe does not need to contact the partInspects complex shapes and sizes of conductive materials Some of the limitations of eddy current inspection include:Only conductive materials can be inspectedSurface must be accessible to the probeSkill and training required is more extensive than other techniquesSurface finish and roughness may interfereReference standards needed for setupDepth of penetration is limitedFlaws such as delaminations that lie parallel to the probe coil winding and probe scan direction are undetectableHere a small surface probe is scanned over the part surface in an attempt to detect a crack.2.1.6-Ultrasonic Inspection (Pulse-Echo)
High frequency sound waves are introduced into a material and they are reflected back from surfaces or flaws.
Reflected sound energy is displayed versus time, and inspector can visualize a cross section of the specimen showing the depth of features that reflect sound.
Ultrasonic Imaging
High resolution images can be produced by plotting signal strength or time-of-flight using a computer-controlled scanning system.
Common Applications of NDTInspection of Raw ProductsInspection Following Secondary ProcessingIn-Services Damage Inspection3.1-Inspection of Raw ProductsForgings, Castings, Extrusions, etc.3.2-Inspection Following Secondary Processing
Machining, Welding, Grinding, Heat treating Plating, etc.
3.3-Inspection for In-Service Damage
Cracking, Corrosion, Erosion/Wear, Heat Damage, etc.
Underwater NDT applications4.1-Pipeline Inspection
NDT is used to inspect pipelines to prevent leaks that could damage the environment. Visual inspection, radiography and electromagnetic testing are some of the NDT methods used.
So, how do you inspect an underwater pipeline?
Engineers have developed devices, called pigs that are sent through the buried pipe to perform inspections and clean the pipe. If you’re standing near a pipeline, vibrations can be felt as these pigs move through the pipeline. The pigs are about the same diameter of the pipe so they range in size from small to huge. The pigs are carried through the pipe by the flow of the liquid or gas and can travel and perform inspections over very large distances. They may be put into the pipe line on one end and taken out at the other. The pigs carry a small computer to collect, store and transmit the data for analysis. In 1997, a pig set a world record when it completed a continuous inspection of the Trans Alaska crude oil pipeline, covering a distance of 1,055 km in one run.
Pigs use several nondestructive testing methods to perform the inspections. Most pigs use a magnetic flux leakage method but some also use ultrasound to perform the inspections. The pig shown below uses magnetic flux leakage. A strong magnetic field is established in the pipe wall using either magnets or by injecting electrical current into the steel.
Damaged areas of the pipe cannot support as much magnetic flux as undamaged areas so magnetic flux leaks out of the pipe wall at the damaged areas. An array of sensor around the circumference of the pig detects the magnetic flux leakage and notes the area of damage. Pigs that use ultrasound, have an array of transducers that emits a high frequency sound pulse perpendicular to the pipe wall and receives echo signals from the inner surface and the outer surface of the pipe. The tool measures the time interval between the arrival of a reflected echoes from inner surface and outer surface to calculate the wall thickness.
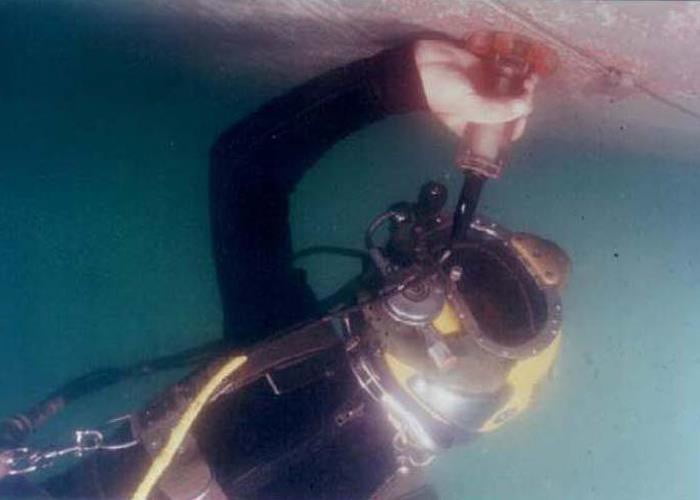
4.2-Methods for some other underwater NDT applications:4.2.1-Ultrasonic Testing with Seaward-Marine DataScan
Seaward DataScan Ultrasonic Testing system allows for the measurement of:
 Underwater Hull ThicknessPipe Wall ThicknessBoiler Tube TestingSheet Piling thicknessHeavily Pitted MaterialStructural SteelOffshore Structures4.2.2-Crack Detection and Definition
Eddy current can be used underwater to quickly determine the presence of a defect without cleaning the hull surface to bare metal. When a crack is detected, the surface is then cleaned to bare metal and underwater magnetic particle is used to define the crack in full color contrast to the surrounding metal.
4.2.3-Cathodic Protection
Cathodic Protection system effectiveness is quickly measured with a high impedance voltmeter grounded to the hull and connected to a diver-transported silver-sliver chloride half cell electrode. If hull potential is out of specification, the cathodic protection system, whether active of passive, is not adequately protecting the hull.
4.2.4-Hull and Propeller Roughness and Paint Thickness
Hull and Propeller Roughness and Paint Thickness measurement helps engineers assess the efficiency of the hull and propeller, make coating system recommendations and make post-repair QA (Quality Assurance) determinations
Codes & Regulations concerning NDT practice:
Specific codes, standards, specifications, regulations, and recommended practices may depend on the country and industry performing NDT. The following is a list of organizations (standards bodies) that develop and publish industrial codes, standards, and recommended practices for NDT methods relating to the oil and gas and chemical processing industries:
The American Society for Nondestructive Testing (ASNT)ASTM InternationalAmerican Society of Mechanical Engineers (ASME)American Petroleum Institute (API)American Welding Society (AWS)National Board of Boiler and Pressure Vessel Inspectors (NBBI)International Organization for Standardization (ISO)European Committee for Standardization (CEN)European Pressure Equipment Directive (PED)REFERENCES:https://en.wikipedia.org/wiki/Nondestructive_testing#Methods_and_techniqueshttp://tspndt.com/non-destructive-testing-industrial-supplies-blog/the-many-uses-of-non-destructive-testinghttps://http://www.nde-ed.org/AboutNDT/SelectedApplications/PipelineInspection/PipelineInspection.htmhttps://http://www.nde-ed.org/EducationResources/CommunityCollege/EddyCurrents/Introduction/IntroductiontoET.htmhttp://www.seaward-marine.com/services/husbandry/ndthttps://en.wikipedia.org/wiki/Eddy-current_testinghttp://www.bindt.org/What-is-NDT/https://inspectioneering.com/tag/nondestructive+testinghttps://http://www.nde-ed.org/GeneralResources/IntroToNDT/GenIntroNDT.php
Article: https://ndtinspect.com/ndt-methods-and-applications/
Sorry, there were no replies found.
Log in to reply.
 Section of material with a surface-breaking crack that is not visible to the naked eye.Penetrant is applied to the surface.Excess penetrant is removed.Developer is applied, rendering the crack visible.2.1.3-Magnetic Particle Inspection
 Underwater Hull ThicknessPipe Wall ThicknessBoiler Tube TestingSheet Piling thicknessHeavily Pitted MaterialStructural SteelOffshore Structures4.2.2-Crack Detection and Definition