PAUT Used to Inspect Rotor-Grade Titanium to SIM-16 Requirements

Ultrasonic testing has taken a technological step forward with phased-array ultrasonic testing (PAUT). This more accurate and more sophisticated system is being used to certify material to SIM-16, a test specification for new aero-engine designs.
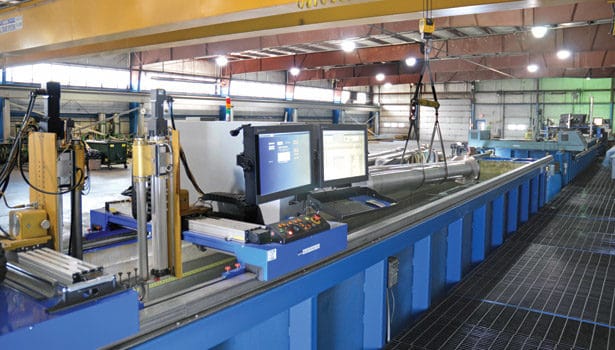
The aerospace industry’s first use of a phased-array ultrasonic testing (PAUT) system was recently installed and is being qualified at West Penn Testing Group’s (WPT) New Kensington, Pa., facility. Aero-engine manufacturers are completing their specifications in order to begin taking advantage of PAUT for nondestructive evaluation of titanium forging stock.
To date, WPT’s system has run trials on 5-, 6-, and 10-inch billets earmarked for the forging of flight-critical components such as rotor disks and hubs.
In 2008, WPT agreed to be the independent test-bed for the commercialization of PAUT. The company began working with a group of raw-material manufacturers, a forge shop and aero-engine original equipment manufacturers (OEMs) to develop a new inspection technology that could address a list of concerns being grappled with by supply-chain planners.
The concerns led to the establishment of criteria for the new inspection system. The goals set by the planners were: to achieve an equivalent level of quality assurance and material-evaluation accuracy compared to multi-zone inspection (MZI); to develop a system that is leaner and more robust than previous technology; to dramatically reduce testing cycle time; to simplify post-evaluation analysis; and to reduce – and ideally eliminate – the incidents that force retesting.
Procurement and material-evaluation decision makers target both the shortening of test cycle time and improving on-time-delivery performance of pre- and post-forging material evaluations. In addition, supply-chain purchasing executives want to maximize the capacity of new testing resources. The objective is the ability to absorb demand created by new jet-engine programs coming online at OEMs – demand that is expected to expand steadily in the 2014-2020 time frame.
The PAUT system can handle material up to 14 inches in diameter and 27 feet in length. The company expects to announce the final qualification milestone prior to the Paris Air Show to be held June 17-23, 2013. SIM-16 no longer allows MZI.
“We now have a new, innovative technology that is equivalent to MZI – a testing technology, by the way, that West Penn helped pioneer in 1995,” said James C. DeChellis, WPT’s president.
SIM-16 is a test specification for new engine designs. The specification is designed to reflect and utilize technological advances in testing that yield more thorough test data. It is essentially a technological update of ultrasonic testing techniques.
The PAUT system developed by WPT satisfies the criteria specified by the supply-chain group. This was achieved primarily by designing an inspection technology that relies on a single probe, which enables extremely rapid setups, and draws on the advanced capabilities of PAUT equipment.
Benefits of PAUT
The PAUT system offers testing labs and their customers an assortment of benefits.
Speed
The enhancements of PAUT grew out of dozens of productivity features incorporated in the new design. It was the selection of a single transducer to perform the material evaluations, however, that initiated the ripple effect that most significantly impacted nearly every aspect of test-cycle time.
First, the time required for setup is reduced – an improvement made possible by the need to set up one rather than the four to 10 transducers that are required in a conventional MZI.
Second, post-inspection evaluations are also streamlined because quality-assurance technicians need only review two C-scan images versus the four to six images typically necessitated by an MZI material evaluation. Third, there are no overscans with PAUT.
The 12- to 24-inch overscans produced during an MZI duplicate significant amounts of data that complicate process analysis. These complications are completely eliminated with PAUT. The result is faster analysis and reporting, which benefits customer and lab alike.
Fourth, the system redesign was guided by demand for faster loading and unloading of barstock and billets, as well as quicker changeover from one stock size to another. The redesign of these – as well as other system features – have significantly accelerated the speed with which most testing steps can be taken.
Accuracy
PAUT’s achievement of equivalent accuracy compared with previous inspection technologies further contributed to cycle-time reduction. For example, precise alignment, a critical factor in ensuring an accurate test, grows out of the single, PAUT-specific transducer.
By separately pulsing nine peripheral elements of a PAUT probe, alignment can be accomplished in minutes with reliable precision. The multiple probes of previous technology could take hours to set up properly, which increased the likelihood of error.
Calibration tasks are also streamlined when an operator has only a single probe to calibrate. The system operator simply calibrates the probe on a flat-bottom hole (FBH) at the start and end of each zone, after which the two FBHs are automatically equalized by advanced system software.
Material-evaluation technicians faced many more time-consuming steps with earlier inspection technologies, which required calibration, equalization and normalization steps for each transducer employed.
Innovations
Having inspected more than 22 million pounds of titanium using MZI, WPT drew upon its wide-ranging expertise to incorporate proven nondestructive testing knowledge into the group’s vision for a new system.
According to the company, it took five years and an investment approaching $1 million to bring this nondestructive inspection technology to the aero-engine supply chain. The challenges of meeting the supply-chain members’ expectations with PAUT technology necessitated a significant effort at system rethinking and numerous iterations to perfect a robust redesign.
For example, WPT modified the test tank, material handling and transducer rig to meet the twin requirements of setup speed and testing accuracy. The follower received a complete redesign to accommodate the stresses created by testing irregularly shaped billets and barstock. This aspect of the redesign is significant because the purpose of a billet follower is to maintain alignment of the transducer beam to the billet surface.
Traditional followers have wheels or balls that ride on the surface of the billet to achieve the following action. Industry has learned to live with the inaccuracies caused by followers as they come on and off of the billet and with the wear and tear caused by the rough deceleration that the probe manipulator experiences while scanning bowed billets. The new non-contact follower addresses each of these issues by using ultrasonic feedback and high-speed actuators to provide smooth following action.
Lastly, WPT’s system integrates motion control with the evaluation software to perform faster “go-to” evaluations for the x-axis and rotational positions. The end result is a material-evaluation system that is flexible enough to trim test cycle times and handle surges while adhering to delivery commitments.
Cost Stability
Another byproduct of system design innovations, the faster test process cycle time and the high level of accuracy are seen in the area of cost-competitiveness. In sum, the advanced technology gives OEMs an alternative test process that offers much in the way of improvements while holding the line on costs.
Capacity
According to DeChellis, the fully installed system and expanded cadre of level-2 inspectors can handle a mix of up to 100,000 pounds of titanium billets each month.
“Our team of ultrasonic level-2 inspectors has the capacity to satisfy demand of more than 700 hours per month of material evaluation. And when our next class of level-2 inspectors, who are now in training, complete their course, we’ll be able to increase our capacity by 20%,” DeChellis said.
For additional information please visit http://www.westpenntesting.com
Also more info regarding PAUT is available in our PAUT Group and Forum section:


